Therma-Tru Slim-Line Sliding Patio Door Assembly and Installation
Therma-Tru Slim-Line Sliding Patio Door Assembly and Installation
Therma-Tru Slim-Line Sliding Patio Door Assembly and Installation

You also want an ePaper? Increase the reach of your titles
YUMPU automatically turns print PDFs into web optimized ePapers that Google loves.
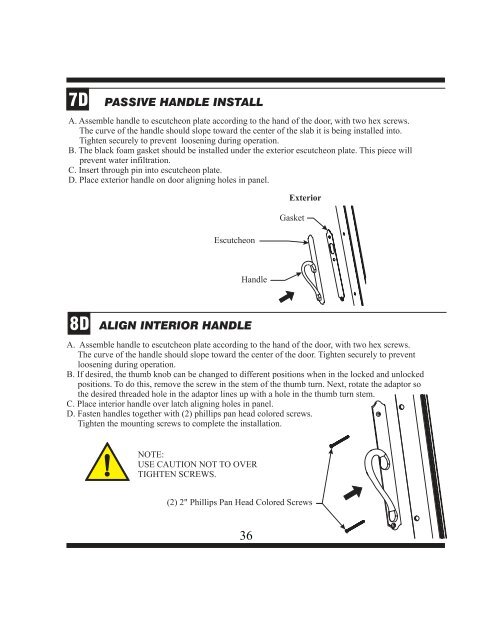
7D PASSIVE HANDLE INSTALL<br />
A. Assemble h<strong>and</strong>le to escutcheon plate according to the h<strong>and</strong> of the door, with two hex screws.<br />
The curve of the h<strong>and</strong>le should slope toward the center of the slab it is being installed into.<br />
Tighten securely to prevent loosening during operation.<br />
B. The black foam gasket should be installed under the exterior escutcheon plate. This piece will<br />
prevent water infiltration.<br />
C. Insert through pin into escutcheon plate.<br />
D. Place exterior h<strong>and</strong>le on door aligning holes in panel.<br />
8D<br />
Escutcheon<br />
ALIGN INTERIOR HANDLE<br />
H<strong>and</strong>le<br />
36<br />
Exterior<br />
A. Assemble h<strong>and</strong>le to escutcheon plate according to the h<strong>and</strong> of the door, with two hex screws.<br />
The curve of the h<strong>and</strong>le should slope toward the center of the door. Tighten securely to prevent<br />
loosening during operation.<br />
B. If desired, the thumb knob can be changed to different positions when in the locked <strong>and</strong> unlocked<br />
positions. To do this, remove the screw in the stem of the thumb turn. Next, rotate the adaptor so<br />
the desired threaded hole in the adaptor lines up with a hole in the thumb turn stem.<br />
C. Place interior h<strong>and</strong>le over latch aligning holes in panel.<br />
D. Fasten h<strong>and</strong>les together with (2) phillips pan head colored screws.<br />
Tighten the mounting screws to complete the installation.<br />
NOTE:<br />
USE CAUTION NOT TO OVER<br />
TIGHTEN SCREWS.<br />
Gasket<br />
(2) 2" Phillips Pan Head Colored Screws