Therma-Tru Slim-Line Sliding Patio Door Assembly and Installation
Therma-Tru Slim-Line Sliding Patio Door Assembly and Installation
Therma-Tru Slim-Line Sliding Patio Door Assembly and Installation

Create successful ePaper yourself
Turn your PDF publications into a flip-book with our unique Google optimized e-Paper software.
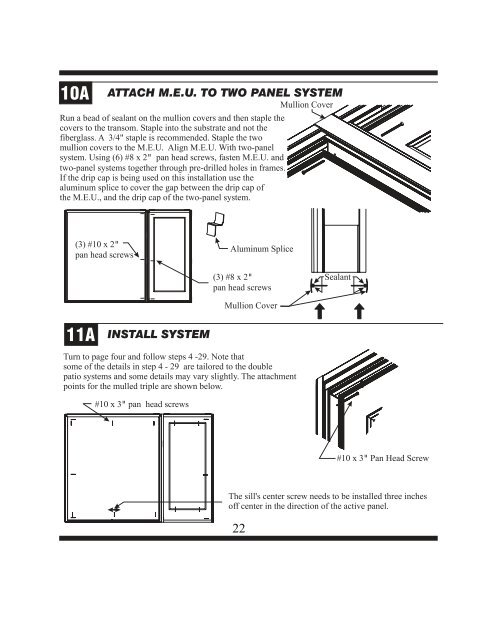
10A<br />
11A<br />
ATTACH M.E.U. TO TWO PANEL SYSTEM<br />
Run a bead of sealant on the mullion covers <strong>and</strong> then staple the<br />
covers to the transom. Staple into the substrate <strong>and</strong> not the<br />
fiberglass. A 3/4" staple is recommended. Staple the two<br />
mullion covers to the M.E.U. Align M.E.U. With two-panel<br />
system. Using (6) #8 x 2“ pan head screws, fasten M.E.U. <strong>and</strong><br />
two-panel systems together through pre-drilled holes in frames.<br />
If the drip cap is being used on this installation use the<br />
aluminum splice to cover the gap between the drip cap of<br />
the M.E.U., <strong>and</strong> the drip cap of the two-panel system.<br />
(3) #10 x 2“<br />
pan head screws<br />
INSTALL SYSTEM<br />
Turn to page four <strong>and</strong> follow steps 4 -29. Note that<br />
some of the details in step4-29 aretailored to the double<br />
patio systems <strong>and</strong> some details may vary slightly. The attachment<br />
points for the mulled triple are shown below.<br />
#10 x 3“ pan head screws<br />
Aluminum Splice<br />
(3) #8 x 2“<br />
pan head screws<br />
Mullion Cover<br />
22<br />
Mullion Cover<br />
Sealant<br />
#10 x 3“ Pan Head Screw<br />
The sill's center screw needs to be installed three inches<br />
off center in the direction of the active panel.