Therma-Tru Slim-Line Sliding Patio Door Assembly and Installation
Therma-Tru Slim-Line Sliding Patio Door Assembly and Installation
Therma-Tru Slim-Line Sliding Patio Door Assembly and Installation

Create successful ePaper yourself
Turn your PDF publications into a flip-book with our unique Google optimized e-Paper software.
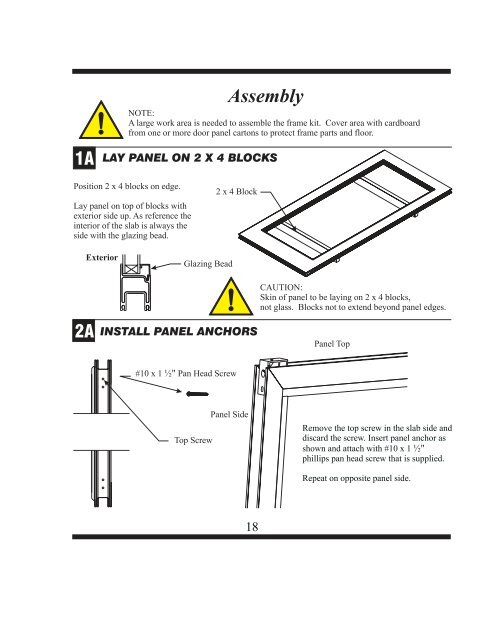
1A<br />
2A<br />
<strong>Assembly</strong><br />
NOTE:<br />
A large work area is needed to assemble the frame kit. Cover area with cardboard<br />
from one or more door panel cartons to protect frame parts <strong>and</strong> floor.<br />
LAY PANEL ON 2X4BLOCKS<br />
Position 2x4blocks on edge.<br />
Lay panel on top of blocks with<br />
exterior side up. As reference the<br />
interior of the slab is always the<br />
side with the glazing bead.<br />
Exterior<br />
Glazing Bead<br />
2 x 4 Block<br />
INSTALL PANEL ANCHORS<br />
#10 x 1 ½" Pan Head Screw<br />
Top Screw<br />
Panel Side<br />
18<br />
CAUTION:<br />
Skin of panel to be laying on 2x4blocks,<br />
not glass. Blocks not to extend beyond panel edges.<br />
Panel Top<br />
Remove the top screw in the slab side <strong>and</strong><br />
discard the screw. Insert panel anchor as<br />
shown <strong>and</strong> attach with #10 x 1 ½"<br />
phillips pan head screw that is supplied.<br />
Repeat on opposite panel side.