Therma-Tru Slim-Line Sliding Patio Door Assembly and Installation
Therma-Tru Slim-Line Sliding Patio Door Assembly and Installation
Therma-Tru Slim-Line Sliding Patio Door Assembly and Installation

You also want an ePaper? Increase the reach of your titles
YUMPU automatically turns print PDFs into web optimized ePapers that Google loves.
19<br />
20<br />
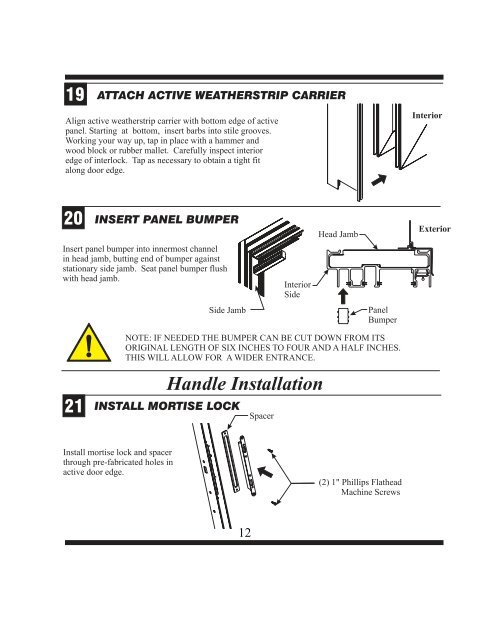
ATTACH ACTIVE WEATHERSTRIP CARRIER<br />
Align active weatherstrip carrier with bottom edge of active<br />
panel. Starting at bottom, insert barbs into stile grooves.<br />
Working your way up, tap in place with a hammer <strong>and</strong><br />
wood block or rubber mallet. Carefully inspect interior<br />
edge of interlock. Tap as necessary to obtain a tight fit<br />
along door edge.<br />
21<br />
INSERT PANEL BUMPER<br />
Insert panel bumper into innermost channel<br />
in head jamb, butting end of bumper against<br />
stationary side jamb. Seat panel bumper flush<br />
with head jamb.<br />
Side Jamb<br />
H<strong>and</strong>le <strong>Installation</strong><br />
12<br />
Interior<br />
Side<br />
Head Jamb<br />
Panel<br />
Bumper<br />
NOTE: IF NEEDED THE BUMPER CAN BE CUT DOWN FROM ITS<br />
ORIGINAL LENGTH OF SIX INCHES TO FOUR AND A HALF INCHES.<br />
THIS WILL ALLOW FOR A WIDER ENTRANCE.<br />
INSTALL MORTISE LOCK<br />
Install mortise lock <strong>and</strong> spacer<br />
through pre-fabricated holes in<br />
active door edge.<br />
Spacer<br />
(2) 1" Phillips Flathead<br />
Machine Screws<br />
Interior<br />
Exterior