Therma-Tru Slim-Line Sliding Patio Door Assembly and Installation
Therma-Tru Slim-Line Sliding Patio Door Assembly and Installation
Therma-Tru Slim-Line Sliding Patio Door Assembly and Installation

Create successful ePaper yourself
Turn your PDF publications into a flip-book with our unique Google optimized e-Paper software.
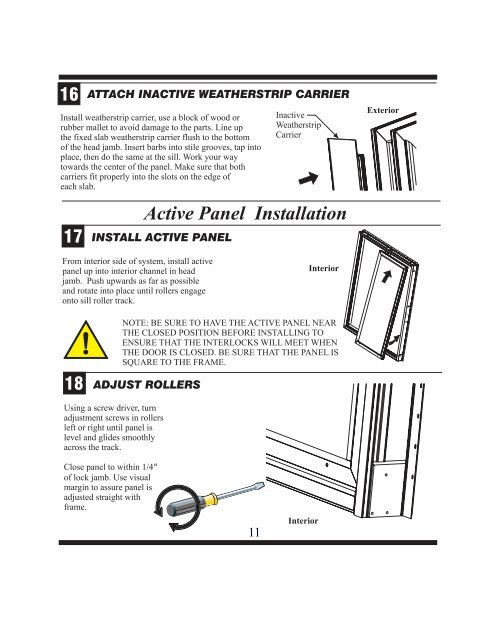
16 ATTACH INACTIVE WEATHERSTRIP CARRIER<br />
Install weatherstrip carrier, use a block of wood or<br />
rubber mallet to avoid damage to the parts. <strong>Line</strong> up<br />
the fixed slab weatherstrip carrier flush to the bottom<br />
of the head jamb. Insert barbs into stile grooves, tap into<br />
place, then do the same at the sill. Work your way<br />
towards the center of the panel. Make sure that both<br />
carriers fit properly into the slots on the edge of<br />
each slab.<br />
17<br />
18<br />
INSTALL ACTIVE PANEL<br />
From interior side of system, install active<br />
panel up into interior channel in head<br />
jamb. Push upwards as far as possible<br />
<strong>and</strong> rotate into place until rollers engage<br />
onto sill roller track.<br />
11<br />
Interior<br />
NOTE: BE SURE TO HAVE THE ACTIVE PANEL NEAR<br />
THE CLOSED POSITION BEFORE INSTALLING TO<br />
ENSURE THAT THE INTERLOCKS WILL MEET WHEN<br />
THE DOOR IS CLOSED. BE SURE THAT THE PANEL IS<br />
SQUARE TO THE FRAME.<br />
ADJUST ROLLERS<br />
Using a screw driver, turn<br />
adjustment screws in rollers<br />
left or right until panel is<br />
level <strong>and</strong> glides smoothly<br />
across the track.<br />
Close panel to within 1/4“<br />
of lock jamb. Use visual<br />
margin to assure panel is<br />
adjusted straight with<br />
frame.<br />
Inactive<br />
Weatherstrip<br />
Carrier<br />
Active Panel <strong>Installation</strong><br />
Interior<br />
Exterior