U 100-C - Astro
U 100-C - Astro
U 100-C - Astro

You also want an ePaper? Increase the reach of your titles
YUMPU automatically turns print PDFs into web optimized ePapers that Google loves.
3 General introduction<br />
3.1 Connecting the U <strong>100</strong>-C to a PC / laptop<br />
When the operating voltage is applied, or after insertion in the slot of the base unit,<br />
the U <strong>100</strong>-C switches itself on automatically. Following a boot phase (approx. 90 seconds),<br />
the ASTRO logo appears in the display. The page “Network/Rack”, on which the IP addresses<br />
appear, is accessed by turning the control knob. If the device is connected to a PC / laptop via<br />
one of the network ports, and if the PC / laptop is suitably configured via the network settings, you<br />
can start configuring the U <strong>100</strong>-C after you enter the IP address in the address line of the web<br />
browser. The IP address is 192.168.1.70 (Mgmt A) or 192.168.5.70 (Mgmt B) in delivery state.<br />
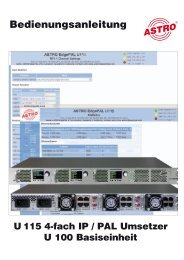
After activating the IP address, a window appears as in the following example:<br />
U <strong>100</strong>-C menu<br />
Figure 5: Example view of the web browser interface before configuration<br />
The controller status appears on the left side of the screen, with the so-called rack view appearing<br />
underneath it, which reflects the view of the head end. Clicking on the required module in this rack<br />
view allows the respective module to be configured. The links from “Log in” to “User manual” lead<br />
to overview pages, and to the configuration of the controller explained in the following.<br />
The heading for the sub-item selected appears in the head line. Furthermore, the date, the time<br />
(UTC), the uptime, the software version and the hardware version appear here. There is the<br />
option of entering a name, location and contact address. This is done in the sub-menu “SNMP”.<br />
The display in the main window corresponds to the sub-menu selected. These could be overview<br />
pages (status, channel overview & inventory report), or controller configuration pages, or user<br />
interfaces for the respective signal converter U 1xx which has been selected.<br />
Operating Manual U 110-C Controller<br />
Main window<br />
Title bar<br />
9