DHIJWASv Software FEFLOW 6.1
DHIJWASv Software FEFLOW 6.1
DHIJWASv Software FEFLOW 6.1

You also want an ePaper? Increase the reach of your titles
YUMPU automatically turns print PDFs into web optimized ePapers that Google loves.
QK=tçêâáåÖ=ïáíÜ=j~éë<br />
OQ=ö=rëÉê=j~åì~ä<br />
Changes before closing the panel.<br />
Double-click on Layer 1 in the Maps panel to<br />
add this layer to the active view. You can switch<br />
between different layers of a map using the checkboxes<br />
in front of these layers in the View Components<br />
panel. The last one activated is always the uppermost<br />
layer. Figure Figure 4.5 gives an example for a certain<br />
style of the imported maps.<br />
The remaining maps that we have loaded contain<br />
spatial information on rivers and wells, i.e., line and<br />
point structures. To enhance the appearance of the rivers<br />
in the active view we change width and color of the<br />
line, again using the Map Properties panel for the<br />
Default layer of the map rivers.<br />
For the map demo_wells the style settings of the<br />
markers and for the labels can be edited separately.<br />
QKTKO j~é=a~í~<br />
Instead of showing both rivers contained in the map<br />
rivers, we only want to plot the eastern one. To do so,<br />
we use a SQL selection statement on the attribute field<br />
NAME of the map to create a data selection that is limited<br />
to the river in the east.<br />
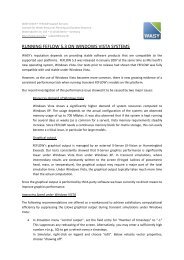
Open the context menu of the map rivers with a<br />
right-click on the map and select Show Map<br />
Table... to display the attribute data of the map in tabular<br />
format (see Figure 4.6). For the attribute field<br />
NAME two different data sets exist, River West and<br />
River East. Close the Map Table dialog and now<br />
choose Join/Select Map(s) Data... to open the Join<br />
Maps dialog. In the input field of Select record where<br />
enter NAME=”River East” as SQL selection statement<br />
to select the map data for the eastern river only. Make<br />
sure to enter the name with a capital R and E as the<br />
SQL syntax is case sensitive.<br />
Figure 4.6 Map Table dialog for the map rivers.<br />
To ensure that the syntax is correct click on<br />
Preview. The map table now only shows one<br />
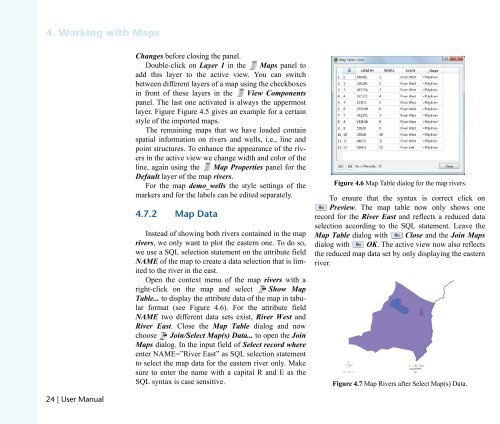
record for the River East and reflects a reduced data<br />
selection according to the SQL statement. Leave the<br />
Map Table dialog with Close and the Join Maps<br />
dialog with OK. The active view now also reflects<br />
the reduced map data set by only displaying the eastern<br />
river.<br />
Figure 4.7 Map Rivers after Select Map(s) Data.