AFRTS Defense Media Center Satellite Handbook
AFRTS Defense Media Center Satellite Handbook
AFRTS Defense Media Center Satellite Handbook

Create successful ePaper yourself
Turn your PDF publications into a flip-book with our unique Google optimized e-Paper software.
<strong>Defense</strong> <strong>Media</strong> <strong>Center</strong> <strong>Satellite</strong> <strong>Handbook</strong> V.3.26<br />
You’ll have to do this if using the protractor method. Most offset dish<br />
manufacturers supply a gauge on the antenna mount that automatically<br />
makes this correction for you, see figure 5-4.<br />
(f) If necessary, loosen the nuts on the antenna support pole so that the<br />
antenna can rotate easily left and right.<br />
(g) Hold the compass flat in the palm of your hand away from the antenna<br />
and any large metal object.<br />
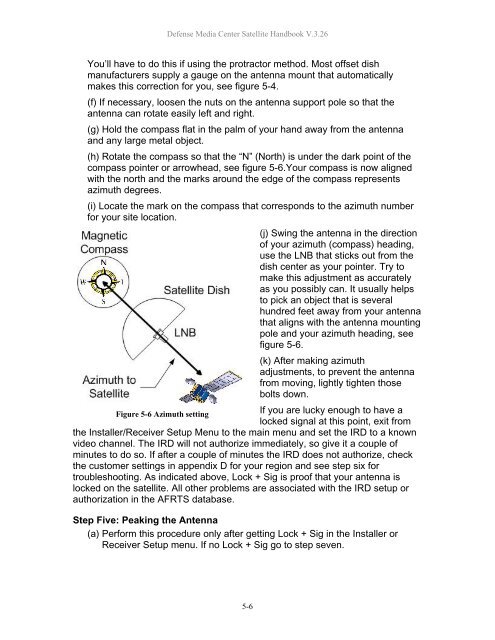
(h) Rotate the compass so that the “N” (North) is under the dark point of the<br />
compass pointer or arrowhead, see figure 5-6.Your compass is now aligned<br />
with the north and the marks around the edge of the compass represents<br />
azimuth degrees.<br />
(i) Locate the mark on the compass that corresponds to the azimuth number<br />
for your site location.<br />
(j) Swing the antenna in the direction<br />
of your azimuth (compass) heading,<br />
use the LNB that sticks out from the<br />
dish center as your pointer. Try to<br />
make this adjustment as accurately<br />
as you possibly can. It usually helps<br />
to pick an object that is several<br />
hundred feet away from your antenna<br />
that aligns with the antenna mounting<br />
pole and your azimuth heading, see<br />
figure 5-6.<br />
(k) After making azimuth<br />
adjustments, to prevent the antenna<br />
from moving, lightly tighten those<br />
bolts down.<br />
Figure 5-6 Azimuth setting<br />
If you are lucky enough to have a<br />
locked signal at this point, exit from<br />
the Installer/Receiver Setup Menu to the main menu and set the IRD to a known<br />
video channel. The IRD will not authorize immediately, so give it a couple of<br />
minutes to do so. If after a couple of minutes the IRD does not authorize, check<br />
the customer settings in appendix D for your region and see step six for<br />
troubleshooting. As indicated above, Lock + Sig is proof that your antenna is<br />
locked on the satellite. All other problems are associated with the IRD setup or<br />
authorization in the <strong>AFRTS</strong> database.<br />
Step Five: Peaking the Antenna<br />
(a) Perform this procedure only after getting Lock + Sig in the Installer or<br />
Receiver Setup menu. If no Lock + Sig go to step seven.<br />
5-6