USE3 Physiolab Software Guide - J&J Engineering Biofeedback ...
USE3 Physiolab Software Guide - J&J Engineering Biofeedback ...
USE3 Physiolab Software Guide - J&J Engineering Biofeedback ...

You also want an ePaper? Increase the reach of your titles
YUMPU automatically turns print PDFs into web optimized ePapers that Google loves.
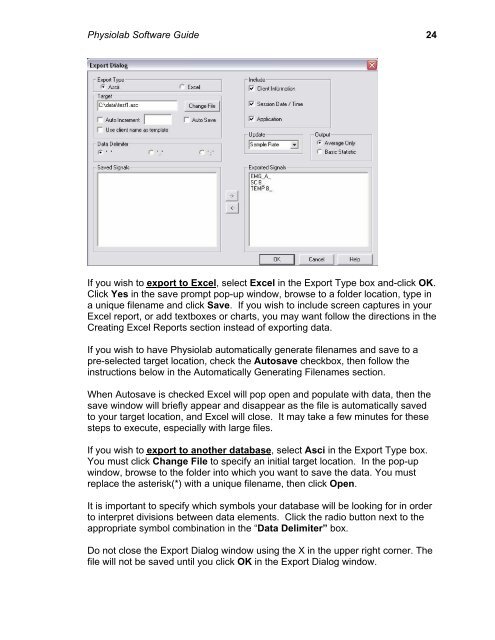
<strong>Physiolab</strong> <strong>Software</strong> <strong>Guide</strong> 24<br />
If you wish to export to Excel, select Excel in the Export Type box and-click OK.<br />
Click Yes in the save prompt pop-up window, browse to a folder location, type in<br />
a unique filename and click Save. If you wish to include screen captures in your<br />
Excel report, or add textboxes or charts, you may want follow the directions in the<br />
Creating Excel Reports section instead of exporting data.<br />
If you wish to have <strong>Physiolab</strong> automatically generate filenames and save to a<br />
pre-selected target location, check the Autosave checkbox, then follow the<br />
instructions below in the Automatically Generating Filenames section.<br />
When Autosave is checked Excel will pop open and populate with data, then the<br />
save window will briefly appear and disappear as the file is automatically saved<br />
to your target location, and Excel will close. It may take a few minutes for these<br />
steps to execute, especially with large files.<br />
If you wish to export to another database, select Asci in the Export Type box.<br />
You must click Change File to specify an initial target location. In the pop-up<br />
window, browse to the folder into which you want to save the data. You must<br />
replace the asterisk(*) with a unique filename, then click Open.<br />
It is important to specify which symbols your database will be looking for in order<br />
to interpret divisions between data elements. Click the radio button next to the<br />
appropriate symbol combination in the “Data Delimiter” box.<br />
Do not close the Export Dialog window using the X in the upper right corner. The<br />
file will not be saved until you click OK in the Export Dialog window.