

Owners Manual (GR-55_OM.pdf) - Roland
Owners Manual (GR-55_OM.pdf) - Roland
Owners Manual (GR-55_OM.pdf) - Roland

You also want an ePaper? Increase the reach of your titles
YUMPU automatically turns print PDFs into web optimized ePapers that Google loves.
Editing the Tones (TONE)<br />
Editing the Tone<br />
Here’s how to make various settings for the tone.<br />
If you want to edit detailed settings, refer to “Editing a Tone (Detailed<br />
Settings)” (p. 24).<br />
Basic operation<br />
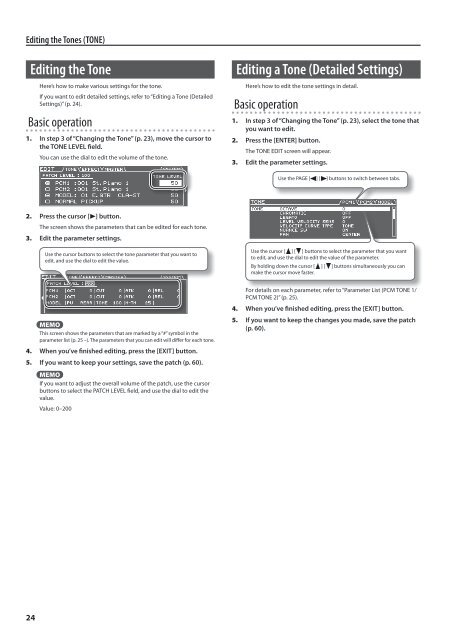
1. In step 3 of “Changing the Tone” (p. 23), move the cursor to<br />
the TONE LEVEL field.<br />
You can use the dial to edit the volume of the tone.<br />
Editing a Tone (Detailed Settings)<br />
Here’s how to edit the tone settings in detail.<br />
Basic operation<br />
1. In step 3 of “Changing the Tone” (p. 23), select the tone that<br />
you want to edit.<br />
2. Press the [ENTER] button.<br />
The TONE EDIT screen will appear.<br />
3. Edit the parameter settings.<br />
Use the PAGE [ ] [ ] buttons to switch between tabs.<br />
2. Press the cursor [ ] button.<br />
The screen shows the parameters that can be edited for each tone.<br />
3. Edit the parameter settings.<br />
Use the cursor buttons to select the tone parameter that you want to<br />
edit, and use the dial to edit the value.<br />
Use the cursor [ ] [ ] buttons to select the parameter that you want<br />
to edit, and use the dial to edit the value of the parameter.<br />
By holding down the cursor [ ] [ ] buttons simultaneously you can<br />
make the cursor move faster.<br />
MEMO<br />
This screen shows the parameters that are marked by a “#” symbol in the<br />
parameter list (p. 25 –). The parameters that you can edit will differ for each tone.<br />
4. When you’ve finished editing, press the [EXIT] button.<br />
5. If you want to keep your settings, save the patch (p. 60).<br />
MEMO<br />
If you want to adjust the overall volume of the patch, use the cursor<br />
buttons to select the PATCH LEVEL field, and use the dial to edit the<br />
value.<br />
Value: 0–200<br />
For details on each parameter, refer to “Parameter List (PCM TONE 1/<br />
PCM TONE 2)” (p. 25).<br />
4. When you’ve finished editing, press the [EXIT] button.<br />
5. If you want to keep the changes you made, save the patch<br />
(p. 60).<br />
24


