vSpace Management Center for the N-series
vSpace Management Center for the N-series
vSpace Management Center for the N-series

You also want an ePaper? Increase the reach of your titles
YUMPU automatically turns print PDFs into web optimized ePapers that Google loves.
NComputing <strong>vSpace</strong> <strong>Management</strong> <strong>Center</strong> User Manual rev06.27.12.2<br />
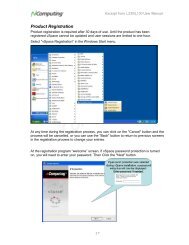
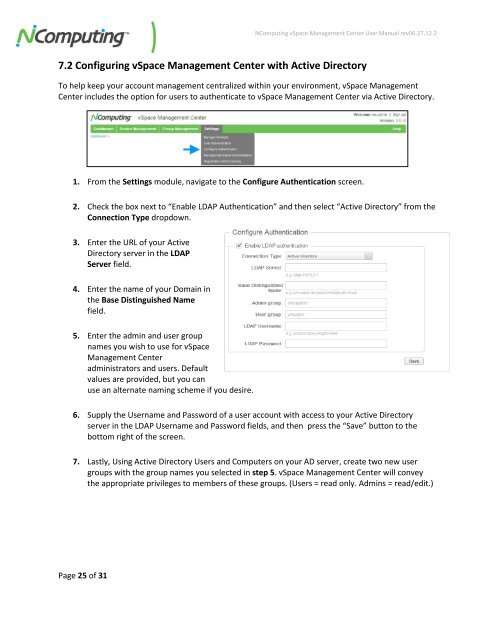
7.2 Configuring <strong>vSpace</strong> <strong>Management</strong> <strong>Center</strong> with Active Directory<br />
To help keep your account management centralized within your environment, <strong>vSpace</strong> <strong>Management</strong><br />
<strong>Center</strong> includes <strong>the</strong> option <strong>for</strong> users to au<strong>the</strong>nticate to <strong>vSpace</strong> <strong>Management</strong> <strong>Center</strong> via Active Directory.<br />
1. From <strong>the</strong> Settings module, navigate to <strong>the</strong> Configure Au<strong>the</strong>ntication screen.<br />
2. Check <strong>the</strong> box next to “Enable LDAP Au<strong>the</strong>ntication” and <strong>the</strong>n select “Active Directory” from <strong>the</strong><br />
Connection Type dropdown.<br />
3. Enter <strong>the</strong> URL of your Active<br />
Directory server in <strong>the</strong> LDAP<br />
Server field.<br />
4. Enter <strong>the</strong> name of your Domain in<br />
<strong>the</strong> Base Distinguished Name<br />
field.<br />
5. Enter <strong>the</strong> admin and user group<br />
names you wish to use <strong>for</strong> <strong>vSpace</strong><br />
<strong>Management</strong> <strong>Center</strong><br />
administrators and users. Default<br />
values are provided, but you can<br />
use an alternate naming scheme if you desire.<br />
6. Supply <strong>the</strong> Username and Password of a user account with access to your Active Directory<br />
server in <strong>the</strong> LDAP Username and Password fields, and <strong>the</strong>n press <strong>the</strong> “Save” button to <strong>the</strong><br />
bottom right of <strong>the</strong> screen.<br />
7. Lastly, Using Active Directory Users and Computers on your AD server, create two new user<br />
groups with <strong>the</strong> group names you selected in step 5. <strong>vSpace</strong> <strong>Management</strong> <strong>Center</strong> will convey<br />
<strong>the</strong> appropriate privileges to members of <strong>the</strong>se groups. (Users = read only. Admins = read/edit.)<br />
Page 25 of 31