vSpace Management Center for the N-series
vSpace Management Center for the N-series
vSpace Management Center for the N-series

You also want an ePaper? Increase the reach of your titles
YUMPU automatically turns print PDFs into web optimized ePapers that Google loves.
NComputing <strong>vSpace</strong> <strong>Management</strong> <strong>Center</strong> User Manual rev06.27.12.2<br />
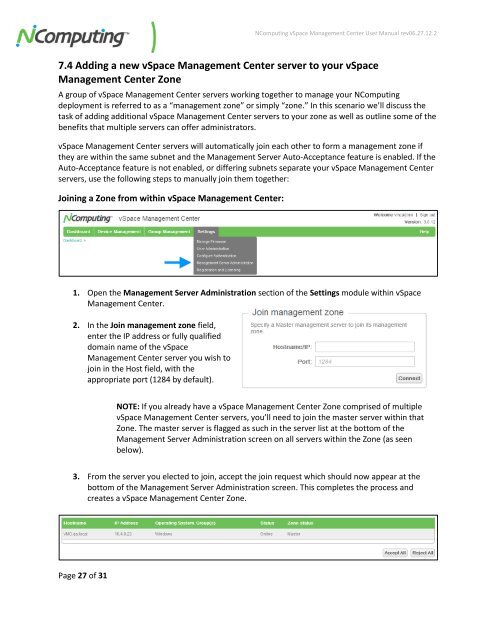
7.4 Adding a new <strong>vSpace</strong> <strong>Management</strong> <strong>Center</strong> server to your <strong>vSpace</strong><br />
<strong>Management</strong> <strong>Center</strong> Zone<br />
A group of <strong>vSpace</strong> <strong>Management</strong> <strong>Center</strong> servers working toge<strong>the</strong>r to manage your NComputing<br />
deployment is referred to as a “management zone” or simply “zone.” In this scenario we’ll discuss <strong>the</strong><br />
task of adding additional <strong>vSpace</strong> <strong>Management</strong> <strong>Center</strong> servers to your zone as well as outline some of <strong>the</strong><br />
benefits that multiple servers can offer administrators.<br />
<strong>vSpace</strong> <strong>Management</strong> <strong>Center</strong> servers will automatically join each o<strong>the</strong>r to <strong>for</strong>m a management zone if<br />
<strong>the</strong>y are within <strong>the</strong> same subnet and <strong>the</strong> <strong>Management</strong> Server Auto-Acceptance feature is enabled. If <strong>the</strong><br />
Auto-Acceptance feature is not enabled, or differing subnets separate your <strong>vSpace</strong> <strong>Management</strong> <strong>Center</strong><br />
servers, use <strong>the</strong> following steps to manually join <strong>the</strong>m toge<strong>the</strong>r:<br />
Joining a Zone from within <strong>vSpace</strong> <strong>Management</strong> <strong>Center</strong>:<br />
1. Open <strong>the</strong> <strong>Management</strong> Server Administration section of <strong>the</strong> Settings module within <strong>vSpace</strong><br />
<strong>Management</strong> <strong>Center</strong>.<br />
2. In <strong>the</strong> Join management zone field,<br />
enter <strong>the</strong> IP address or fully qualified<br />
domain name of <strong>the</strong> <strong>vSpace</strong><br />
<strong>Management</strong> <strong>Center</strong> server you wish to<br />
join in <strong>the</strong> Host field, with <strong>the</strong><br />
appropriate port (1284 by default).<br />
NOTE: If you already have a <strong>vSpace</strong> <strong>Management</strong> <strong>Center</strong> Zone comprised of multiple<br />
<strong>vSpace</strong> <strong>Management</strong> <strong>Center</strong> servers, you’ll need to join <strong>the</strong> master server within that<br />
Zone. The master server is flagged as such in <strong>the</strong> server list at <strong>the</strong> bottom of <strong>the</strong><br />
<strong>Management</strong> Server Administration screen on all servers within <strong>the</strong> Zone (as seen<br />
below).<br />
3. From <strong>the</strong> server you elected to join, accept <strong>the</strong> join request which should now appear at <strong>the</strong><br />
bottom of <strong>the</strong> <strong>Management</strong> Server Administration screen. This completes <strong>the</strong> process and<br />
creates a <strong>vSpace</strong> <strong>Management</strong> <strong>Center</strong> Zone.<br />
Page 27 of 31