
You also want an ePaper? Increase the reach of your titles
YUMPU automatically turns print PDFs into web optimized ePapers that Google loves.
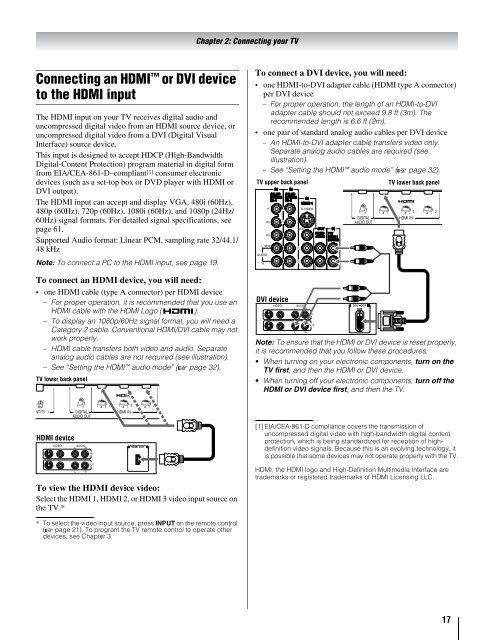
Chapter 2: Connecting your TV<br />
Connecting an HDMI or DVI device<br />
to the HDMI input<br />
The HDMI input on your TV receives digital audio and<br />
uncompressed digital video from an HDMI source device, or<br />
uncompressed digital video from a DVI (Digital Visual<br />
Interface) source device.<br />
This input is designed to accept HDCP (High-Bandwidth<br />
Digital-Content Protection) program material in digital form<br />
from EIA/CEA-861-D–compliant [1] consumer electronic<br />
devices (such as a set-top box or DVD player with HDMI or<br />
DVI output).<br />
The HDMI input can accept and display VGA, 480i (60Hz),<br />
480p (60Hz), 720p (60Hz), 1080i (60Hz), and 1080p (24Hz/<br />
60Hz) signal formats. For detailed signal specifications, see<br />
page 61.<br />
Supported Audio format: Linear PCM, sampling rate 32/44.1/<br />
48 kHz<br />
Note: To connect a PC to the HDMI input, see page 19.<br />
To connect an HDMI device, you will need:<br />
• one HDMI cable (type A connector) per HDMI device<br />
– For proper operation, it is recommended that you use an<br />
HDMI cable with the HDMI Logo ( ).<br />
– To display an 1080p/60Hz signal format, you will need a<br />
Category 2 cable. Conventional HDMI/DVI cable may not<br />
work properly.<br />
– HDMI cable transfers both video and audio. Separate<br />
analog audio cables are not required (see illustration).<br />
– See “Setting the HDMI audio mode” (- page 32).<br />
TV lower back panel<br />
To connect a DVI device, you will need:<br />
• one HDMI-to-DVI adapter cable (HDMI type A connector)<br />
per DVI device<br />
– For proper operation, the length of an HDMI-to-DVI<br />
adapter cable should not exceed 9.8 ft (3m). The<br />
recommended length is 6.6 ft (2m).<br />
• one pair of standard analog audio cables per DVI device<br />
– An HDMI-to-DVI adapter cable transfers video only.<br />
Separate analog audio cables are required (see<br />
illustration).<br />
– See “Setting the HDMI audio mode” (- page 32).<br />
TV upper back panel<br />
DVI device<br />
VIDEO<br />
AUDIO<br />
L R<br />
L<br />
R<br />
IN IN<br />
OUT<br />
DVI/HDCP<br />
OUT<br />
TV lower back panel<br />
Note: To ensure that the HDMI or DVI device is reset properly,<br />
it is recommended that you follow these procedures:<br />
• When turning on your electronic components, turn on the<br />
TV first, and then the HDMI or DVI device.<br />
• When turning off your electronic components, turn off the<br />
HDMI or DVI device first, and then the TV.<br />
HDMI device<br />
VIDEO<br />
AUDIO<br />
L R<br />
IN IN<br />
HDMI OUT<br />
[1] EIA/CEA-861-D compliance covers the transmission of<br />
uncompressed digital video with high-bandwidth digital content<br />
protection, which is being standardized for reception of highdefinition<br />
video signals. Because this is an evolving technology, it<br />
is possible that some devices may not operate properly with the TV.<br />
L<br />
R<br />
OUT<br />
To view the HDMI device video:<br />
Select the HDMI 1, HDMI 2, or HDMI 3 video input source on<br />
the TV.*<br />
HDMI, the HDMI logo and High-Definition Multimedia Interface are<br />
trademarks or registered trademarks of HDMI Licensing LLC.<br />
* To select the video input source, press INPUT on the remote control<br />
(- page 21). To program the TV remote control to operate other<br />
devices, see Chapter 3.<br />
17