Cleopatra Enterprise - Cost Engineering
Cleopatra Enterprise - Cost Engineering
Cleopatra Enterprise - Cost Engineering
Create successful ePaper yourself
Turn your PDF publications into a flip-book with our unique Google optimized e-Paper software.
Installation<br />
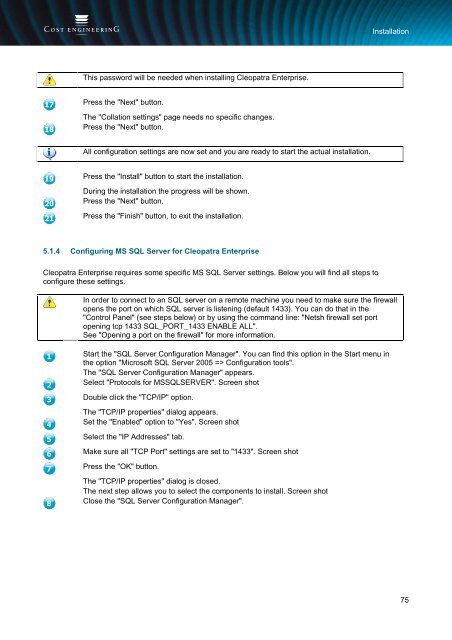
This password will be needed when installing <strong>Cleopatra</strong> <strong>Enterprise</strong>.<br />
Press the "Next" button.<br />
The "Collation settings" page needs no specific changes.<br />
Press the "Next" button.<br />
All configuration settings are now set and you are ready to start the actual installation.<br />
Press the "Install" button to start the installation.<br />
During the installation the progress will be shown.<br />
Press the "Next" button.<br />
Press the "Finish" button, to exit the installation.<br />
5.1.4 Configuring MS SQL Server for <strong>Cleopatra</strong> <strong>Enterprise</strong><br />
<strong>Cleopatra</strong> <strong>Enterprise</strong> requires some specific MS SQL Server settings. Below you will find all steps to<br />
configure these settings.<br />
In order to connect to an SQL server on a remote machine you need to make sure the firewall<br />
opens the port on which SQL server is listening (default 1433). You can do that in the<br />
"Control Panel" (see steps below) or by using the command line: "Netsh firewall set port<br />
opening tcp 1433 SQL_PORT_1433 ENABLE ALL".<br />
See "Opening a port on the firewall" for more information.<br />
Start the "SQL Server Configuration Manager". You can find this option in the Start menu in<br />
the option "Microsoft SQL Server 2005 => Configuration tools".<br />
The "SQL Server Configuration Manager" appears.<br />
Select "Protocols for MSSQLSERVER". Screen shot<br />
Double click the "TCP/IP" option.<br />
The "TCP/IP properties" dialog appears.<br />
Set the "Enabled" option to "Yes". Screen shot<br />
Select the "IP Addresses" tab.<br />
Make sure all "TCP Port" settings are set to "1433". Screen shot<br />
Press the "OK" button.<br />
The "TCP/IP properties" dialog is closed.<br />
The next step allows you to select the components to install. Screen shot<br />
Close the "SQL Server Configuration Manager".<br />
75


