Valent_IOM_Controls - RJI-Sales.com
Valent_IOM_Controls - RJI-Sales.com
Valent_IOM_Controls - RJI-Sales.com

Create successful ePaper yourself
Turn your PDF publications into a flip-book with our unique Google optimized e-Paper software.
LCD Settings<br />
All VPR, VPRE, VPRP and VPRX series units are<br />
equipped with a fully-programmed microprocessor<br />
controller with the following standard features:<br />
• Liquid crystal display (LCD) interface<br />
• Internal time clock (may be disabled)<br />
• Primary controls sequence (discharge air control)<br />
• Component safeties and alarms<br />
• Ethernet RJ-45 network port<br />
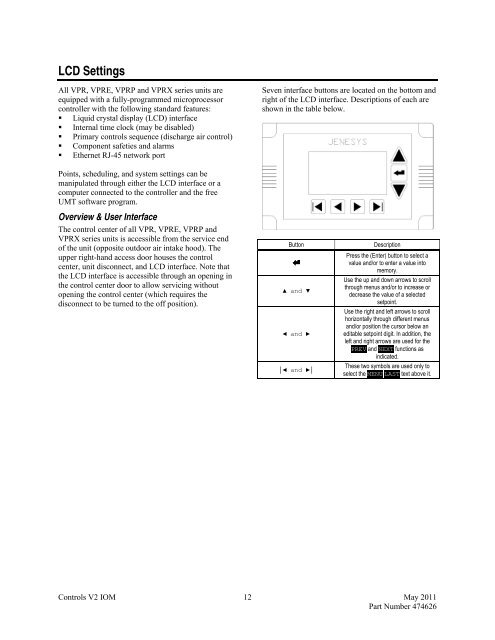
Seven interface buttons are located on the bottom and<br />
right of the LCD interface. Descriptions of each are<br />
shown in the table below.<br />
Points, scheduling, and system settings can be<br />
manipulated through either the LCD interface or a<br />
<strong>com</strong>puter connected to the controller and the free<br />
UMT software program.<br />
Overview & User Interface<br />
The control center of all VPR, VPRE, VPRP and<br />
VPRX series units is accessible from the service end<br />
of the unit (opposite outdoor air intake hood). The<br />
upper right-hand access door houses the control<br />
center, unit disconnect, and LCD interface. Note that<br />
the LCD interface is accessible through an opening in<br />
the control center door to allow servicing without<br />
opening the control center (which requires the<br />
disconnect to be turned to the off position).<br />
Button<br />
▲ and ▼<br />
◄ and ►<br />
│◄ and ►│<br />
Description<br />
Press the (Enter) button to select a<br />
value and/or to enter a value into<br />
memory.<br />
Use the up and down arrows to scroll<br />
through menus and/or to increase or<br />
decrease the value of a selected<br />
setpoint.<br />
Use the right and left arrows to scroll<br />
horizontally through different menus<br />
and/or position the cursor below an<br />
editable setpoint digit. In addition, the<br />
left and right arrows are used for the<br />
PREV and NEXT functions as<br />
indicated.<br />
These two symbols are used only to<br />
select the MENU LAST text above it.<br />
<strong>Controls</strong> V2 <strong>IOM</strong> 12 May 2011<br />
Part Number 474626