Compact / CANopen /HMI Controller / XBT GC ... - Schneider Electric
Compact / CANopen /HMI Controller / XBT GC ... - Schneider Electric
Compact / CANopen /HMI Controller / XBT GC ... - Schneider Electric

Create successful ePaper yourself
Turn your PDF publications into a flip-book with our unique Google optimized e-Paper software.
Implementation<br />
Introduction<br />
The implementation chapter describes all the steps necessary to initialize, to configure, to<br />
program and start-up the system to achieve the application functions as listed below.<br />
Function<br />
Start up and functional description<br />
1. Ensure all motor circuit breakers and Multi9 circuit breakers are in the ON position.<br />
2. Ensure that the mains switch is in the ON position.<br />
3. Press the "ACKN E-STOP" blue illuminated pushbutton on the main cabinet door<br />
to acknowledge the system is energized. The blue illuminated pushbutton will turn<br />
OFF if the system is energized.<br />
4. Ensure that all machine interlocks are engaged (i.e. the door guard switches)<br />
5. Press the "ACKN DOOR -READY" blue illuminated pushbutton on the main<br />
cabinet door to acknowledge the system is ready for operation. The blue<br />
illuminated pushbutton will turn OFF if the system is ready for operation.<br />
6. Use Magelis <strong>XBT</strong><strong>GC</strong> <strong>HMI</strong> controller to control/monitor the system.<br />
a. The “BUS”, “ALARM”, “SAFETY” screens can be used to monitor the<br />
network, system status and alarm messages.<br />
b. The “ATV312” screen can be used to control/monitor Altivar 312 variable<br />
speed drives.<br />
c. The “LXM32” screen can be used to control/monitor Lexium 32A servo<br />
drives.<br />
d. The “TeSys” screen can be used to control/monitor TeSysU motor starter.<br />
e. The “OTB” screen can be used to observe the status of the OTB I/O.<br />
f. The “System” screen can be used to see the status of the local <strong>XBT</strong><strong>GC</strong> I/O.<br />
g. Use the “<strong>XBT</strong><strong>GC</strong>” screen to configure the <strong>HMI</strong>.<br />
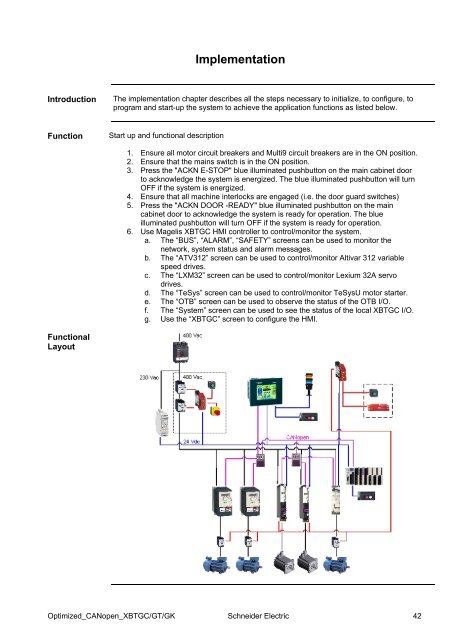
Functional<br />
Layout<br />
Optimized_<strong>CANopen</strong>_<strong>XBT</strong><strong>GC</strong>/GT/GK <strong>Schneider</strong> <strong>Electric</strong> 42