FELCOM 16
FELCOM 16
FELCOM 16
You also want an ePaper? Increase the reach of your titles
YUMPU automatically turns print PDFs into web optimized ePapers that Google loves.
4. INMARSAT C OPERATIONS<br />
4.2.2 Setting the receive alarm<br />
An audio alarm may be set to sound when a routine or confidential message is<br />
received. The factory setting is OFF. Set alarm volume at the PC.<br />
1. Press the [F8] key to display the Setup menu.<br />
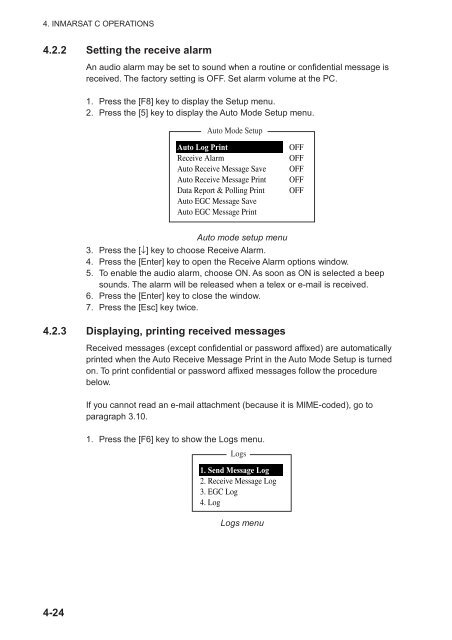
2. Press the [5] key to display the Auto Mode Setup menu.<br />
Auto Mode Setup<br />
Auto Log Print<br />
Receive Alarm<br />
Auto Receive Message Save<br />
Auto Receive Message Print<br />
Data Report & Polling Print<br />
Auto EGC Message Save<br />
Auto EGC Message Print<br />
OFF<br />
OFF<br />
OFF<br />
OFF<br />
OFF<br />
Auto mode setup menu<br />
3. Press the [↓] key to choose Receive Alarm.<br />
4. Press the [Enter] key to open the Receive Alarm options window.<br />
5. To enable the audio alarm, choose ON. As soon as ON is selected a beep<br />
sounds. The alarm will be released when a telex or e-mail is received.<br />
6. Press the [Enter] key to close the window.<br />
7. Press the [Esc] key twice.<br />
4.2.3 Displaying, printing received messages<br />
Received messages (except confidential or password affixed) are automatically<br />
printed when the Auto Receive Message Print in the Auto Mode Setup is turned<br />
on. To print confidential or password affixed messages follow the procedure<br />
below.<br />
If you cannot read an e-mail attachment (because it is MIME-coded), go to<br />
paragraph 3.10.<br />
1. Press the [F6] key to show the Logs menu.<br />
Logs<br />
1. Send Message Log<br />
2. Receive Message Log<br />
3. EGC Log<br />
4. Log<br />
Logs menu<br />
4-24


