Manual - Unvented Gas Log Heater or Vented Decorative Appliance
Manual - Unvented Gas Log Heater or Vented Decorative Appliance
Manual - Unvented Gas Log Heater or Vented Decorative Appliance
- No tags were found...

Create successful ePaper yourself
Turn your PDF publications into a flip-book with our unique Google optimized e-Paper software.
BLDV7 Series <strong>Gas</strong> Fireplace<br />
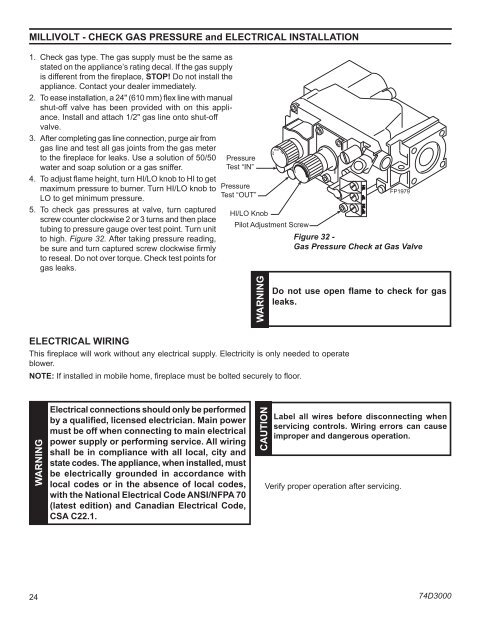
Millivolt - CHECK GAS PRESSURE and Electrical installation<br />
1. Check gas type. The gas supply must be the same as<br />
stated on the appliance’s rating decal. If the gas supply<br />
is different from the fireplace, STOP! Do not install the<br />
appliance. Contact your dealer immediately.<br />
2. To ease installation, a 24" (610 mm) flex line with manual<br />
shut-off valve has been provided with on this appliance.<br />
Install and attach 1/2" gas line onto shut-off<br />
valve.<br />
3. After completing gas line connection, purge air from<br />
gas line and test all gas joints from the gas meter<br />
to the fireplace f<strong>or</strong> leaks. Use a solution of 50/50<br />
water and soap solution <strong>or</strong> a gas sniffer.<br />
4. To adjust flame height, turn HI/LO knob to HI to get<br />
maximum pressure to burner. Turn HI/LO knob to<br />
LO to get minimum pressure.<br />
5. To check gas pressures at valve, turn captured<br />
screw counter clockwise 2 <strong>or</strong> 3 turns and then place<br />
tubing to pressure gauge over test point. Turn unit<br />
to high. Figure 32. After taking pressure reading,<br />
be sure and turn captured screw clockwise firmly<br />
to reseal. Do not over t<strong>or</strong>que. Check test points f<strong>or</strong><br />
gas leaks.<br />
Pressure<br />
Test “IN”<br />
Pressure<br />
Test “OUT”<br />
HI/LO Knob<br />
Pilot Adjustment Screw<br />
WARNING<br />
FP1979<br />
Figure 32 -<br />
<strong>Gas</strong> Pressure Check at <strong>Gas</strong> Valve<br />
FP1979<br />
Millivolt gas valve<br />
Do not use open flame to check f<strong>or</strong> gas<br />
leaks.<br />
Electrical Wiring<br />
This fireplace will w<strong>or</strong>k without any electrical supply. Electricity is only needed to operate<br />
blower.<br />
NOTE: If installed in mobile home, fireplace must be bolted securely to flo<strong>or</strong>.<br />
WARNING<br />
Electrical connections should only be perf<strong>or</strong>med<br />
by a qualified, licensed electrician. Main power<br />
must be off when connecting to main electrical<br />
power supply <strong>or</strong> perf<strong>or</strong>ming service. All wiring<br />
shall be in compliance with all local, city and<br />
state codes. The appliance, when installed, must<br />
be electrically grounded in acc<strong>or</strong>dance with<br />
local codes <strong>or</strong> in the absence of local codes,<br />
with the National Electrical Code ANSI/NFPA 70<br />
(latest edition) and Canadian Electrical Code,<br />
CSA C22.1.<br />
CAUTION<br />
Label all wires bef<strong>or</strong>e disconnecting when<br />
servicing controls. Wiring err<strong>or</strong>s can cause<br />
improper and dangerous operation.<br />
Verify proper operation after servicing.<br />
24<br />
74D3000