Manual - Unvented Gas Log Heater or Vented Decorative Appliance
Manual - Unvented Gas Log Heater or Vented Decorative Appliance
Manual - Unvented Gas Log Heater or Vented Decorative Appliance
- No tags were found...

You also want an ePaper? Increase the reach of your titles
YUMPU automatically turns print PDFs into web optimized ePapers that Google loves.
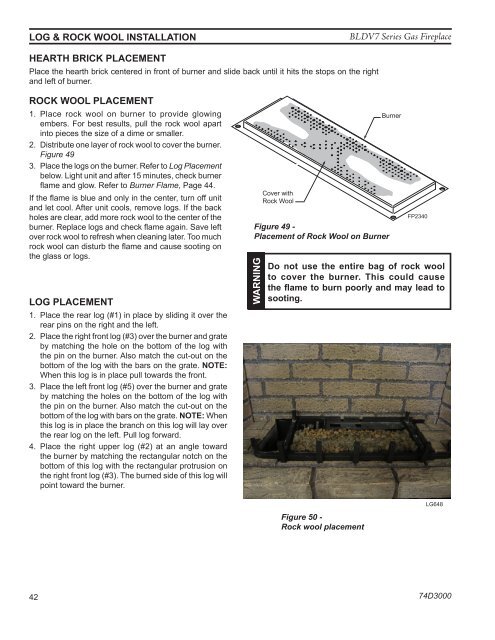
log & rock wool installation<br />
BLDV7 Series <strong>Gas</strong> Fireplace<br />
HEARTH BRICK placement<br />
Place the hearth brick centered in front of burner and slide back until it hits the stops on the right<br />
and left of burner.<br />
rock wool placement<br />
1. Place rock wool on burner to provide glowing<br />
embers. F<strong>or</strong> best results, pull the rock wool apart<br />
into pieces the size of a dime <strong>or</strong> smaller.<br />
2. Distribute one layer of rock wool to cover the burner.<br />
Figure 49<br />
3. Place the logs on the burner. Refer to <strong>Log</strong> Placement<br />
below. Light unit and after 15 minutes, check burner<br />
flame and glow. Refer to Burner Flame, Page 44.<br />
If the flame is blue and only in the center, turn off unit<br />
and let cool. After unit cools, remove logs. If the back<br />
holes are clear, add m<strong>or</strong>e rock wool to the center of the<br />
burner. Replace logs and check flame again. Save left<br />
over rock wool to refresh when cleaning later. Too much<br />
rock wool can disturb the flame and cause sooting on<br />
the glass <strong>or</strong> logs.<br />
lOG placement<br />
1. Place the rear log (#1) in place by sliding it over the<br />
rear pins on the right and the left.<br />
2. Place the right front log (#3) over the burner and grate<br />
by matching the hole on the bottom of the log with<br />
the pin on the burner. Also match the cut-out on the<br />
bottom of the log with the bars on the grate. Note:<br />
When this log is in place pull towards the front.<br />
3. Place the left front log (#5) over the burner and grate<br />
by matching the holes on the bottom of the log with<br />
the pin on the burner. Also match the cut-out on the<br />
bottom of the log with bars on the grate. Note: When<br />
this log is in place the branch on this log will lay over<br />
the rear log on the left. Pull log f<strong>or</strong>ward.<br />
4. Place the right upper log (#2) at an angle toward<br />
the burner by matching the rectangular notch on the<br />
bottom of this log with the rectangular protrusion on<br />
the right front log (#3). The burned side of this log will<br />
point toward the burner.<br />
Figure 49 -<br />
Placement of Rock Wool on Burner<br />
WARNING<br />
Cover with<br />
Rock Wool<br />
Burner<br />
FP2340<br />
FP2340<br />
BDVL base<br />
Do not use the entire bag of rock wool<br />
to cover the burner. This could cause<br />
the flame to burn po<strong>or</strong>ly and may lead to<br />
sooting.<br />
Figure 50 -<br />
Rock wool placement<br />
LG648<br />
BLDV ember place<br />
LG648<br />
42<br />
74D3000