Submitted version of the thesis - Airlab, the Artificial Intelligence ...
Submitted version of the thesis - Airlab, the Artificial Intelligence ...
Submitted version of the thesis - Airlab, the Artificial Intelligence ...

You also want an ePaper? Increase the reach of your titles
YUMPU automatically turns print PDFs into web optimized ePapers that Google loves.
138 Appendix C. User Manual<br />
C.2 Setting up <strong>the</strong> environment (Qt SDK Opensource)<br />
Download<strong>the</strong>2009.04<strong>version</strong><strong>of</strong><strong>the</strong>QtSDKfromhere: ftp://ftp.qt.nokia.com/qtsdk/qtsdk-win-opensource-2009.04.exe<br />
Do not download <strong>the</strong> last <strong>version</strong>, at <strong>the</strong><br />
moment our s<strong>of</strong>tware works only with Qt 4.5.x. Run <strong>the</strong> executable that<br />
will install on your pc <strong>the</strong> Qt Framework 4.5.3 and <strong>the</strong> Qt Creator IDE.<br />
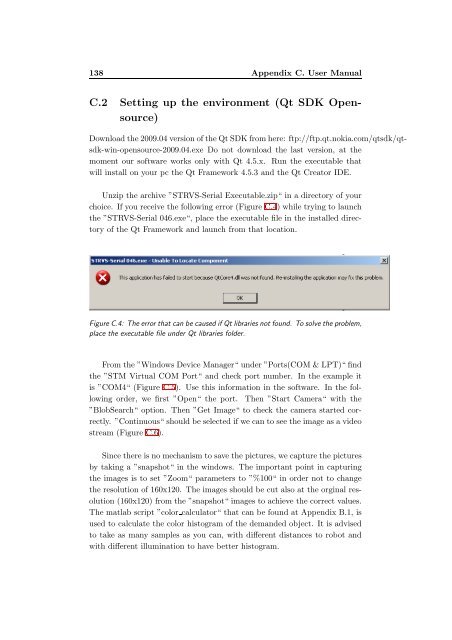
Unzip <strong>the</strong> archive ”STRVS-Serial Executable.zip“ in a directory <strong>of</strong> your<br />
choice. If you receive <strong>the</strong> following error (Figure C.4) while trying to launch<br />
<strong>the</strong> ”STRVS-Serial 046.exe“, place <strong>the</strong> executable file in <strong>the</strong> installed directory<br />
<strong>of</strong> <strong>the</strong> Qt Framework and launch from that location.<br />
FigureC.4: Theerrorthat canbe causedifQtlibrariesnotfound. Tosolve<strong>the</strong> problem,<br />
place <strong>the</strong> executable file under Qt libraries folder.<br />
From <strong>the</strong> ”Windows Device Manager“ under ”Ports(COM & LPT)“ find<br />
<strong>the</strong> ”STM Virtual COM Port“ and check port number. In <strong>the</strong> example it<br />
is ”COM4“ (Figure C.5). Use this information in <strong>the</strong> s<strong>of</strong>tware. In <strong>the</strong> following<br />
order, we first ”Open“ <strong>the</strong> port. Then ”Start Camera“ with <strong>the</strong><br />
”BlobSearch“ option. Then ”Get Image“ to check <strong>the</strong> camera started correctly.<br />
”Continuous“ should be selected if we can to see <strong>the</strong> image as a video<br />
stream (Figure C.6).<br />
Since <strong>the</strong>re is no mechanism to save <strong>the</strong> pictures, we capture <strong>the</strong> pictures<br />
by taking a ”snapshot“ in <strong>the</strong> windows. The important point in capturing<br />
<strong>the</strong> images is to set ”Zoom“ parameters to ”%100“ in order not to change<br />
<strong>the</strong> resolution <strong>of</strong> 160x120. The images should be cut also at <strong>the</strong> orginal resolution<br />
(160x120) from <strong>the</strong> ”snapshot“ images to achieve <strong>the</strong> correct values.<br />
The matlab script ”color calculator“ that can be found at Appendix B.1, is<br />
used to calculate <strong>the</strong> color histogram <strong>of</strong> <strong>the</strong> demanded object. It is advised<br />
to take as many samples as you can, with different distances to robot and<br />
with different illumination to have better histogram.