LR-24 Electrofisher - Field Environmental Instruments
LR-24 Electrofisher - Field Environmental Instruments
LR-24 Electrofisher - Field Environmental Instruments

Create successful ePaper yourself
Turn your PDF publications into a flip-book with our unique Google optimized e-Paper software.
<strong>LR</strong>-<strong>24</strong><br />
BACKPACK ELECTROFISHER<br />
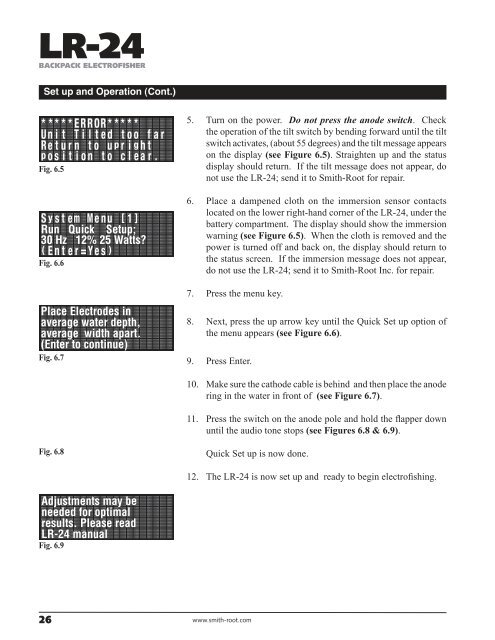
Set up and Operation (Cont.)<br />
Fig. 6.5<br />
Fig. 6.6<br />
5. Turn on the power. Do not press the anode switch. Check<br />
the operation of the tilt switch by bending forward until the tilt<br />
switch activates, (about 55 degrees) and the tilt message appears<br />
on the display (see Figure 6.5). Straighten up and the status<br />
display should return. If the tilt message does not appear, do<br />
not use the <strong>LR</strong>-<strong>24</strong>; send it to Smith-Root for repair.<br />
6. Place a dampened cloth on the immersion sensor contacts<br />
located on the lower right-hand corner of the <strong>LR</strong>-<strong>24</strong>, under the<br />
battery compartment. The display should show the immersion<br />
warning (see Figure 6.5). When the cloth is removed and the<br />
power is turned off and back on, the display should return to<br />
the status screen. If the immersion message does not appear,<br />
do not use the <strong>LR</strong>-<strong>24</strong>; send it to Smith-Root Inc. for repair.<br />
7. Press the menu key.<br />
8. Next, press the up arrow key until the Quick Set up option of<br />
the menu appears (see Figure 6.6).<br />
Fig. 6.7<br />
9. Press Enter.<br />
10. Make sure the cathode cable is behind and then place the anode<br />
ring in the water in front of (see Figure 6.7).<br />
11. Press the switch on the anode pole and hold the flapper down<br />
until the audio tone stops (see Figures 6.8 & 6.9).<br />
Fig. 6.8<br />
Quick Set up is now done.<br />
12. The <strong>LR</strong>-<strong>24</strong> is now set up and ready to begin electrofishing.<br />
Fig. 6.9<br />
26 www.smith-root.com