SYNCRO_V_MANUAL_EN_R1_web - Digimerge
SYNCRO_V_MANUAL_EN_R1_web - Digimerge
SYNCRO_V_MANUAL_EN_R1_web - Digimerge

You also want an ePaper? Increase the reach of your titles
YUMPU automatically turns print PDFs into web optimized ePapers that Google loves.
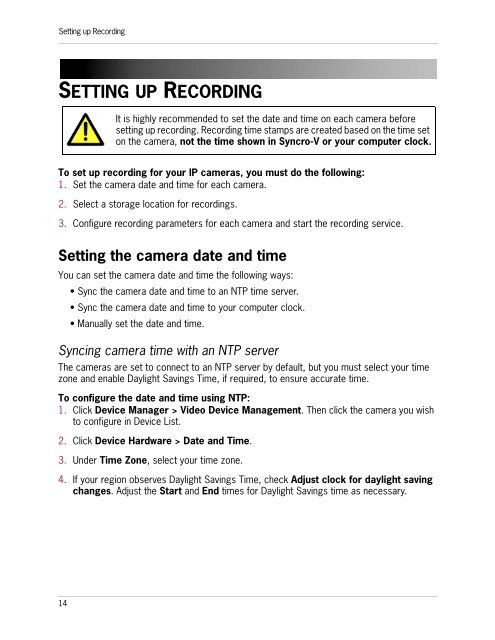
Setting up RecordingSETTING UP RECORDINGIt is highly recommended to set the date and time on each camera beforesetting up recording. Recording time stamps are created based on the time seton the camera, not the time shown in Syncro-V or your computer clock.To set up recording for your IP cameras, you must do the following:1. Set the camera date and time for each camera.2. Select a storage location for recordings.3. Configure recording parameters for each camera and start the recording service.Setting the camera date and timeYou can set the camera date and time the following ways:• Sync the camera date and time to an NTP time server.• Sync the camera date and time to your computer clock.• Manually set the date and time.Syncing camera time with an NTP serverThe cameras are set to connect to an NTP server by default, but you must select your timezone and enable Daylight Savings Time, if required, to ensure accurate time.To configure the date and time using NTP:1. Click Device Manager > Video Device Management. Then click the camera you wishto configure in Device List.2. Click Device Hardware > Date and Time.3. Under Time Zone, select your time zone.4. If your region observes Daylight Savings Time, check Adjust clock for daylight savingchanges. Adjust the Start and End times for Daylight Savings time as necessary.14