Brocade Netiron CES and Brocade Netiron CER Devices Hardware ...
Brocade Netiron CES and Brocade Netiron CER Devices Hardware ...
Brocade Netiron CES and Brocade Netiron CER Devices Hardware ...

Create successful ePaper yourself
Turn your PDF publications into a flip-book with our unique Google optimized e-Paper software.
Redundant power supply installation 3<br />
7. With one h<strong>and</strong>, hold the bar on the front panel of the power supply. With the other h<strong>and</strong>,<br />
support the underside of the power supply, <strong>and</strong> insert the power supply into the empty power<br />
supply slot. Press until the supply is completely in the slot, so that the connectors on the back<br />
of the supply are fully engaged with the pins on the power backplane (Figure 22).<br />
CAUTION<br />
Make sure you insert the power supply right-side up. It is possible to insert the supply upside<br />
down, although the supply will not engage with the power backplane when upside down. The<br />
power supply is right-side up when the manufacturer label is on the top.<br />
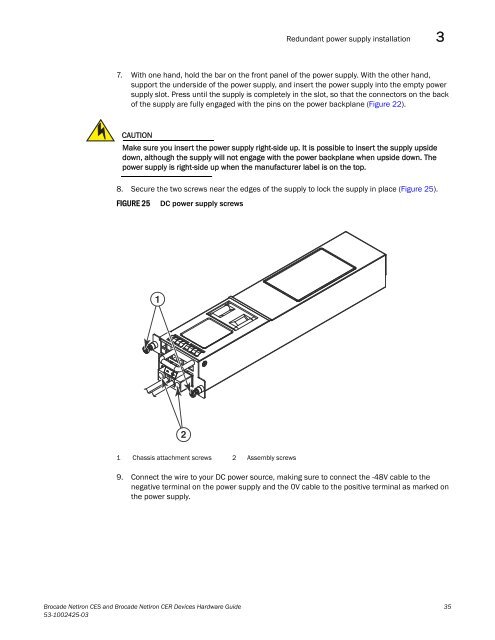
8. Secure the two screws near the edges of the supply to lock the supply in place (Figure 25).<br />
FIGURE 25 DC power supply screws<br />
1<br />
2<br />
1 Chassis attachment screws 2 Assembly screws<br />
9. Connect the wire to your DC power source, making sure to connect the -48V cable to the<br />
negative terminal on the power supply <strong>and</strong> the 0V cable to the positive terminal as marked on<br />
the power supply.<br />
<strong>Brocade</strong> NetIron <strong>CES</strong> <strong>and</strong> <strong>Brocade</strong> NetIron <strong>CER</strong> <strong>Devices</strong> <strong>Hardware</strong> Guide 35<br />
53-1002425-03