
You also want an ePaper? Increase the reach of your titles
YUMPU automatically turns print PDFs into web optimized ePapers that Google loves.
18 DSR Installer/User Guide<br />
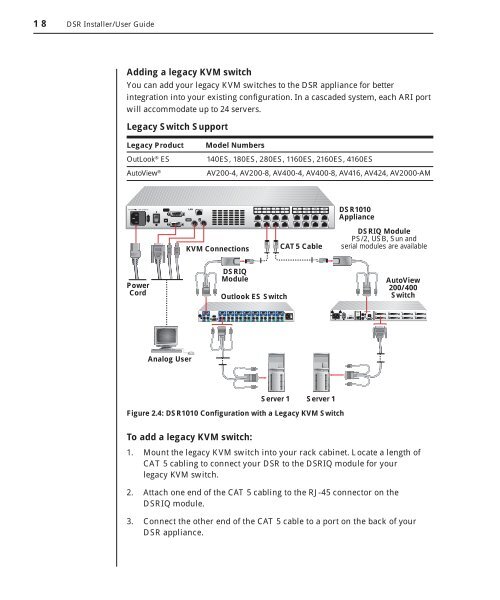
Adding a legacy KVM switch<br />
You can add your legacy KVM switches to the DSR appliance for better<br />
integration into your existing configuration. In a cascaded system, each ARI port<br />
will accommodate up to 24 servers.<br />
Legacy Switch Support<br />
Legacy Product Model Numbers<br />
OutLook ® ES 140ES, 180ES, 280ES, 1160ES, 2160ES, 4160ES<br />
AutoView ® AV200-4, AV200-8, AV400-4, AV400-8, AV416, AV424, AV2000-AM<br />
Power<br />
Cord<br />
Analog User<br />
KVM Connections<br />
CAT 5 Cable<br />
DSR1010<br />
Appliance<br />
DSRIQ Module<br />
PS/2, USB, Sun and<br />
serial modules are available<br />
DSRIQ<br />
Module AutoView<br />
200/400<br />
Outlook ES Switch<br />
Switch<br />
Server 1 Server 1<br />
Figure 2.4: DSR1010 Configuration with a Legacy KVM Switch<br />
To add a legacy KVM switch:<br />
1. Mount the legacy KVM switch into your rack cabinet. Locate a length of<br />
CAT 5 cabling to connect your DSR to the DSRIQ module for your<br />
legacy KVM switch.<br />
2. Attach one end of the CAT 5 cabling to the RJ-45 connector on the<br />
DSRIQ module.<br />
3. Connect the other end of the CAT 5 cable to a port on the back of your<br />
DSR appliance.