Power Spot 250 User Manual (pdf) - Elation Professional
Power Spot 250 User Manual (pdf) - Elation Professional
Power Spot 250 User Manual (pdf) - Elation Professional

Create successful ePaper yourself
Turn your PDF publications into a flip-book with our unique Google optimized e-Paper software.
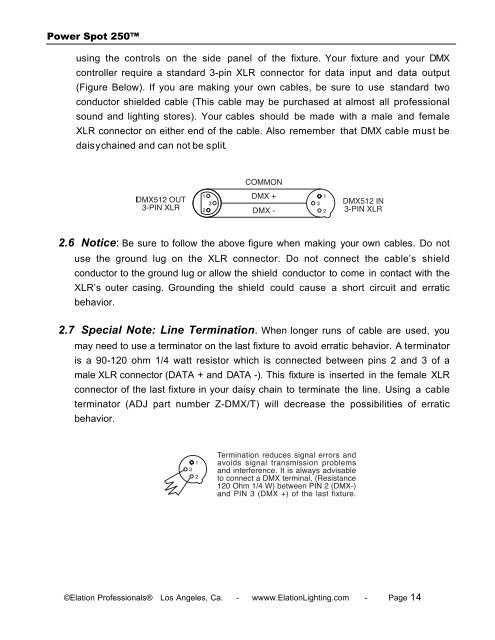
<strong>Power</strong> <strong>Spot</strong> <strong>250</strong>using the controls on the side panel of the fixture. Your fixture and your DMXcontroller require a standard 3-pin XLR connector for data input and data output(Figure Below). If you are making your own cables, be sure to use standard twoconductor shielded cable (This cable may be purchased at almost all professionalsound and lighting stores). Your cables should be made with a male and femaleXLR connector on either end of the cable. Also remember that DMX cable must bedaisy chained and can not be split.2.6 Notice: Be sure to follow the above figure when making your own cables. Do notuse the ground lug on the XLR connector. Do not connect the cable’s shieldconductor to the ground lug or allow the shield conductor to come in contact with theXLR’s outer casing. Grounding the shield could cause a short circuit and erraticbehavior.2.7 Special Note: Line Termination. When longer runs of cable are used, youmay need to use a terminator on the last fixture to avoid erratic behavior. A terminatoris a 90-120 ohm 1/4 watt resistor which is connected between pins 2 and 3 of amale XLR connector (DATA + and DATA -). This fixture is inserted in the female XLRconnector of the last fixture in your daisy chain to terminate the line. Using a cableterminator (ADJ part number Z-DMX/T) will decrease the possibilities of erraticbehavior.132©<strong>Elation</strong> <strong>Professional</strong>s® Los Angeles, Ca. - wwww.<strong>Elation</strong>Lighting.com - Page 14