Grundoram Manual (PDF 1.7MB) - TT Technologies Inc.
Grundoram Manual (PDF 1.7MB) - TT Technologies Inc.
Grundoram Manual (PDF 1.7MB) - TT Technologies Inc.
- No tags were found...

Create successful ePaper yourself
Turn your PDF publications into a flip-book with our unique Google optimized e-Paper software.
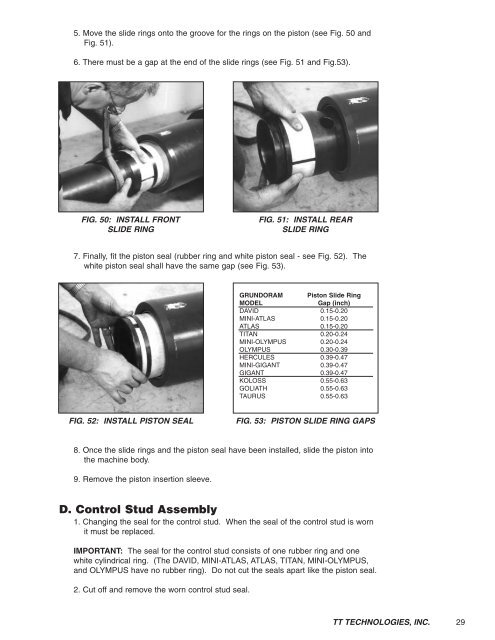
5. Move the slide rings onto the groove for the rings on the piston (see Fig. 50 andFig. 51).6. There must be a gap at the end of the slide rings (see Fig. 51 and Fig.53).FIG. 50: INSTALL FRONTSLIDE RINGFIG. 51: INSTALL REARSLIDE RING7. Finally, fit the piston seal (rubber ring and white piston seal - see Fig. 52). Thewhite piston seal shall have the same gap (see Fig. 53).GRUNDORAM Piston Slide RingMODELGap (inch)DAVID 0.15-0.20MINI-ATLAS 0.15-0.20ATLAS 0.15-0.20TITAN 0.20-0.24MINI-OLYMPUS 0.20-0.24OLYMPUS 0.30-0.39HERCULES 0.39-0.47MINI-GIGANT 0.39-0.47GIGANT 0.39-0.47KOLOSS 0.55-0.63GOLIATH 0.55-0.63TAURUS 0.55-0.63FIG. 52: INSTALL PISTON SEALFIG. 53: PISTON SLIDE RING GAPS8. Once the slide rings and the piston seal have been installed, slide the piston intothe machine body.9. Remove the piston insertion sleeve.D. Control Stud Assembly1. Changing the seal for the control stud. When the seal of the control stud is wornit must be replaced.IMPORTANT: The seal for the control stud consists of one rubber ring and onewhite cylindrical ring. (The DAVID, MINI-ATLAS, ATLAS, TITAN, MINI-OLYMPUS,and OLYMPUS have no rubber ring). Do not cut the seals apart like the piston seal.2. Cut off and remove the worn control stud seal.<strong>TT</strong> TECHNOLOGIES, INC.29