Section 05: Automatic Tool Changers - FadalCNC.com
Section 05: Automatic Tool Changers - FadalCNC.com
Section 05: Automatic Tool Changers - FadalCNC.com

Create successful ePaper yourself
Turn your PDF publications into a flip-book with our unique Google optimized e-Paper software.
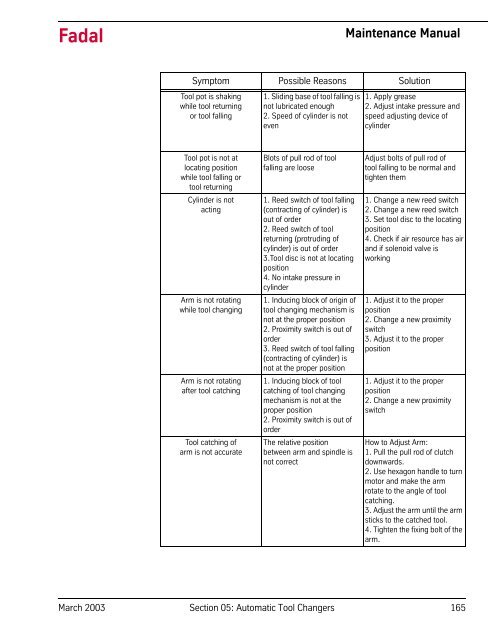
FadalMaintenance ManualSymptom Possible Reasons Solution<strong>Tool</strong> pot is shakingwhile tool returningor tool falling1. Sliding base of tool falling isnot lubricated enough2. Speed of cylinder is noteven1. Apply grease2. Adjust intake pressure andspeed adjusting device ofcylinder<strong>Tool</strong> pot is not atlocating positionwhile tool falling ortool returningCylinder is notactingArm is not rotatingwhile tool changingArm is not rotatingafter tool catching<strong>Tool</strong> catching ofarm is not accurateBlots of pull rod of toolfalling are loose1. Reed switch of tool falling(contracting of cylinder) isout of order2. Reed switch of toolreturning (protruding ofcylinder) is out of order3.<strong>Tool</strong> disc is not at locatingposition4. No intake pressure incylinder1. Inducing block of origin oftool changing mechanism isnot at the proper position2. Proximity switch is out oforder3. Reed switch of tool falling(contracting of cylinder) isnot at the proper position1. Inducing block of toolcatching of tool changingmechanism is not at theproper position2. Proximity switch is out oforderThe relative positionbetween arm and spindle isnot correctAdjust bolts of pull rod oftool falling to be normal andtighten them1. Change a new reed switch2. Change a new reed switch3. Set tool disc to the locatingposition4. Check if air resource has airand if solenoid valve isworking1. Adjust it to the properposition2. Change a new proximityswitch3. Adjust it to the properposition1. Adjust it to the properposition2. Change a new proximityswitchHow to Adjust Arm:1. Pull the pull rod of clutchdownwards.2. Use hexagon handle to turnmotor and make the armrotate to the angle of toolcatching.3. Adjust the arm until the armsticks to the catched tool.4. Tighten the fixing bolt of thearm.March 2003 <strong>Section</strong> <strong>05</strong>: <strong>Automatic</strong> <strong>Tool</strong> <strong>Changers</strong> 165