

Image Acquisitionand Proces

Create successful ePaper yourself
Turn your PDF publications into a flip-book with our unique Google optimized e-Paper software.
178 <strong>Image</strong> Acquisition <strong>Proces</strong>sing with LabVIEW<br />
7.3 MATHEMATICAL MANIPULATION OF IMAGES<br />
If you are not able to Þnd a VI within the Vision Toolkit that will perform the<br />
function that you need, and deÞning a custom Þlter (see Chapter 5) is not appropriate,<br />
then breaking an image into a two-dimensional array of intensity values and performing<br />
a custom mathematical process on them may be the only option available.<br />
7.3.1 IMAGE TO TWO-DIMENSIONAL ARRAY<br />
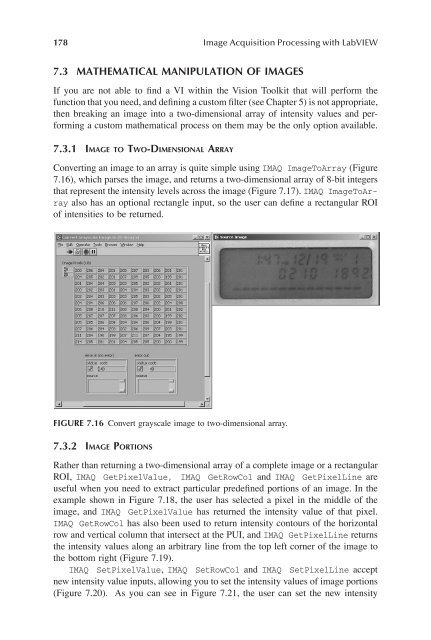
Converting an image to an array is quite simple using IMAQ <strong>Image</strong>ToArray (Figure<br />
7.16), which parses the image, and returns a two-dimensional array of 8-bit integers<br />
that represent the intensity levels across the image (Figure 7.17). IMAQ <strong>Image</strong>ToArray<br />
also has an optional rectangle input, so the user can deÞne a rectangular ROI<br />
of intensities to be returned.<br />
FIGURE 7.16 Convert grayscale image to two-dimensional array.<br />
7.3.2 IMAGE PORTIONS<br />
Rather than returning a two-dimensional array of a complete image or a rectangular<br />
ROI, IMAQ GetPixelValue, IMAQ GetRowCol and IMAQ GetPixelLine are<br />
useful when you need to extract particular predeÞned portions of an image. In the<br />
example shown in Figure 7.18, the user has selected a pixel in the middle of the<br />
image, and IMAQ GetPixelValue has returned the intensity value of that pixel.<br />
IMAQ GetRowCol has also been used to return intensity contours of the horizontal<br />
row and vertical column that intersect at the PUI, and IMAQ GetPixelLine returns<br />
the intensity values along an arbitrary line from the top left corner of the image to<br />
the bottom right (Figure 7.19).<br />
IMAQ SetPixelValue, IMAQ SetRowCol and IMAQ SetPixelLine accept<br />
new intensity value inputs, allowing you to set the intensity values of image portions<br />
(Figure 7.20). As you can see in Figure 7.21, the user can set the new intensity