Maria Knobelsdorf, University of Dortmund, Germany - Didaktik der ...
Maria Knobelsdorf, University of Dortmund, Germany - Didaktik der ...
Maria Knobelsdorf, University of Dortmund, Germany - Didaktik der ...

You also want an ePaper? Increase the reach of your titles
YUMPU automatically turns print PDFs into web optimized ePapers that Google loves.
longer than one to two weeks (which equals 2-4 lessons), milestones<br />
are used to structure the process and point out major<br />
achievements within the project. We suggest identifying 2-3 milestones<br />
for each project, representing versions <strong>of</strong> the final product<br />
with increasing value. However, only the achievement for the next<br />
milestone in the development is determined at a time. Milestones<br />
can be used for presenting the project progress for the rest <strong>of</strong> the<br />
class or teachers. Also, milestones should be positioned at times<br />
when the project pauses and teacher input is planned. Goals for<br />
the next milestone and the project progress are visualized at the<br />
project board.<br />
3.2.7 Project Board<br />
Project boards visualize goals and status <strong>of</strong> a current iteration and<br />
support target-oriented discussions. They present user stories and<br />
tasks in different status areas. Project boards are updated and<br />
discussed throughout the entire process. Thereby, it helps team<br />
members to keep track <strong>of</strong> the progress <strong>of</strong> the design process: the<br />
different areas <strong>of</strong> the board are used to present goals and accomplishments<br />
to the whole team. There are three main status areas:<br />
to-do user stories with associated tasks for the current iteration,<br />
tasks that are in progress, and completed tasks. Furthermore, there<br />
is an area to store user stories that need to be reconsi<strong>der</strong>ed in a<br />
future iteration. To provide a clear view, another area is reserved<br />
for finished user stories, allowing to take <strong>of</strong>f corresponding task<br />
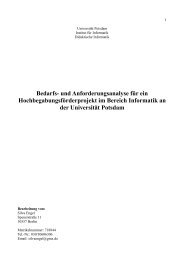
cards. Figure 6 presents an accordant project board.<br />
Additionally, a burn-down chart is available on the project board.<br />
The chart visualizes the working time left in an iteration and work<br />
that needs to be done according to the task estimates. The chart is<br />
constantly keeping track <strong>of</strong> the progress by plotting the remaining<br />
sum <strong>of</strong> tasks at the end <strong>of</strong> a working unit.<br />
Likewise, in a school s<strong>of</strong>tware project all user stories with corresponding<br />
tasks are collected and presented at the team’s project<br />
board. The project board is the central organizational and informative<br />
workspace for the entire project and should be available<br />
at all times, e.g. by placement at the classroom wall. It is also the<br />
meeting point for the regular standup meetings.<br />
Fig. 6. Project Board including a burn-down chart.<br />
3.2.8 Standup Meetings<br />
Standup meetings provide a recurring fast and short update <strong>of</strong> the<br />
efforts <strong>of</strong> the team: Each team member has to report on accomplished<br />
tasks, possible issues in accomplishing certain goals, and<br />
59<br />
a plan for the work day. Meetings are done while standing to<br />
guarantee a fast and goal oriented session kicking <strong>of</strong>f a workday<br />
and should not exceed 5 to 15 minutes.<br />
In school projects, standup meetings can provide an elegant way<br />
for starting <strong>of</strong>f a lesson or working day within a project by encouraging<br />
team communication, sustaining motivation and identifying<br />
problems. The team gathers around the project board and<br />
recalls the project status, success and problems <strong>of</strong> the last working<br />
session and the goals for the day. After each team member has<br />
given a short statement the burn down chart is updated. If nonminor<br />
problems are identified, a longer meeting may be scheduled.<br />
3.2.9 Pair Programming<br />
Pair programming ensures an elaborated coding style: A pair <strong>of</strong><br />
programmers uses a single programming environment for coding.<br />
The person using the keyboard and mouse is adopting the role <strong>of</strong><br />
the “driver”. The driver is actually coding and asked to present his<br />
or her ideas to the second programmer (the “navigator”) verbally.<br />
Meanwhile, the navigator questions the coding outcomes, discusses<br />
possible misinterpretations, and seeks for alternative solutions<br />
that are more straightforward by keeping in focus the overall<br />
goals. The roles <strong>of</strong> driver and navigator are changed repeatedly<br />
during a workday. Programming in pairs helps to detect possible<br />
slips in the design and architecture <strong>of</strong> the code at early stages.<br />
Furthermore, it helps programmers to build upon social interaction<br />
uncovering misinterpretations <strong>of</strong> relations and intentions <strong>of</strong><br />
code parts.<br />
In many schools, two students share one computer due to limited<br />
hardware availability and hence <strong>of</strong>ten program in pairs. The agile<br />
method <strong>of</strong> pair programming supports this practice and adds a<br />
framework that encourages attention from both students, mutual<br />
learning and a notion <strong>of</strong> programming as a social activity.<br />
Fig. 7 illustrates the organization <strong>of</strong> a school s<strong>of</strong>tware project<br />
based on AMoPCE as described above. Other agile methods and<br />
ideas may be included in such a school project as well, e.g. test<br />
driven development, refactoring or “keep it simple”.<br />
3.3 Focusing on Programming Style and Outcome<br />
Several agile practices may be applied in the process to bring<br />
forward a high quality outcome. However, since these practices<br />
are optional for project organization and partly depend on programming<br />
environments, in the following they are only summarized<br />
but not adapted for school s<strong>of</strong>tware projects.<br />
3.3.1 Test Driven Development<br />
Test driven development replaces documentation and provides<br />
criteria to evaluate the code solutions: Programmers define intended<br />
functionalities by writing automatic tests covering all<br />
states and the correctness <strong>of</strong> the accordant results. First reports <strong>of</strong><br />
using this method in secondary education have been published<br />
(e.g. [10]).<br />
3.3.2 Refactoring<br />
Refactoring introduces the idea that every part <strong>of</strong> the code should<br />
be reconsi<strong>der</strong>ed and changed if a more accurate solution can be<br />
found: Developers should rewrite parts <strong>of</strong> code without adding<br />
functionality when there is a more straightforward solution available<br />
that passes all automatic tests. Emphasizing this aspect may<br />
raise students’ awareness <strong>of</strong> efficiency and for evaluating different<br />
solutions.