Hawk Sport Construction Manual
Hawk Sport Construction Manual
Hawk Sport Construction Manual

Create successful ePaper yourself
Turn your PDF publications into a flip-book with our unique Google optimized e-Paper software.
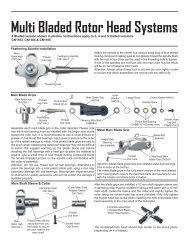
STEP STEP 15 15 Collective Collective Collective and and Aileron Aileron Levers<br />
Levers<br />
From parts bag 2: Press in two M6x10 ball bearings into the front side frames for the collective axle.<br />
Insert two M3x10 Socket Cap Screws through the right (R) Collective arm and attach the collective axle<br />
(notice that the round 6mm collective axle is attached at the middle hole) and hex spacer using threadlock.<br />
Slide the assembly through the ball bearings in the upper side frames from the right. Using threadlock<br />
attach the Left Collective Arms with two M3x10 Socket Cap Screws. Tighten the screws insuring the<br />
collective lever moves freely with no side to side play. Install one M3 Short Ball on to the collective lever<br />
using threadlock.<br />
The left Aileron Bellcrank has two oilite bearings pre-installed into the bellcrank, install the two<br />
Short Balls to the flat side and insert the slide tube through the bellcrank using a small amount of lubricant<br />
(the the bellcrank bellcrank bellcrank is is is offset, offset, make make make sure sure sure the the the slide slide slide tube tube tube is is is inserted inserted inserted from from from the the the offset offset offset side). side<br />
side Starting on the<br />
left side, remove the 3x30mm Socket Cap Screw and short spacer from the elevator bellcrank (previously<br />
assembled in Step 12), slide the left aileron assembly onto the screw and insert through the left collective<br />
lever. Apply threadlock to the end of the screw threads now and slide on the short spacer before tightening<br />
into the elevator bellcrank axle. Repeat for the other side. Slide one Threaded Extension Rod through<br />
the upper position of the tail output bearing recess and secure two Canopy Standoffs (one per side) using<br />
threadlock.<br />
M3x30 PH Socket<br />
Cap Screw x 2<br />
(from Step 12)<br />
M3x10 Socket<br />
Cap Screws x 4<br />
Aileron<br />
Bellcrank<br />
[ HI3031A ]<br />
M6 x 10 Ball<br />
Bearing x 2<br />
[CNBB1060]<br />
R<br />
Slide Tube<br />
Repeat<br />
twice<br />
Short Ball x 4<br />
[CNLR1014]<br />
Collective<br />
Hex Spacer<br />
Short Ball<br />
[CNLR1014]<br />
Canopy<br />
Standoff x 2<br />
[HW3127A]<br />
Collective Axle<br />
(6mm dia)<br />
Short Spacer<br />
L<br />
Upper frame<br />
assembly from<br />
Step 14<br />
Threaded<br />
Extension<br />
Rod<br />
Slide Tube<br />
Flat Side<br />
Collective<br />
Levers<br />
[HW3024]<br />
13