Hawk Sport Construction Manual
Hawk Sport Construction Manual
Hawk Sport Construction Manual

Create successful ePaper yourself
Turn your PDF publications into a flip-book with our unique Google optimized e-Paper software.
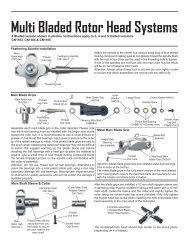
STEP STEP 9 9 Tail Tail Transmission Transmission Output Output Gear<br />
Gear<br />
From parts bag 2: Assemble the Tail<br />
Transmission Output Gear assembly.<br />
Install the E-Ring (be careful not to lose<br />
it, it can easily spring away during installation).<br />
Slide the two Ball Bearings onto<br />
the front of the Tail Rotor Output Shaft.<br />
Using threadlock, insert one 3x4mm Set<br />
Screw into the gear, Note where the flat<br />
spot is on the shaft, slide the gear on and<br />
tighten the set screw (Make Make sure sure the the set<br />
set<br />
screw screw is is positioned positioned over over the the flat flat spot spot). spot<br />
STEP STEP 10 10 Counter Counter Gear Gear Assembly<br />
Assembly<br />
From parts bag 2: Assemble the<br />
engine drive gear assembly. Start by<br />
inserting the guide pin into the hole in<br />
the end of the Drive Shaft. Insert the<br />
shaft through the Counter Gear<br />
(make make sure sure sure the the pin pin pin is is fully fully seated seated seated in<br />
in<br />
the the recessed recessed slot slot at at the the bottom bottom of<br />
of<br />
the the gear gear gear) gear gear then slide the two M5x13<br />
Ball Bearings followed by the two<br />
M5x7 spacers. Using locktite, insert<br />
one 3x4mm Set Screw into the Alloy<br />
Drive Gear, then slide the gear onto<br />
the shaft taking care to position the<br />
set screw over the flat spot on the<br />
shaft. Secure the drive gear to the<br />
shaft.<br />
Careful setup in the drive train<br />
will ensure trouble free operation.<br />
M3x4 Set Screw<br />
(small hex key)<br />
Tail Rotor Output<br />
Gear [HW3057]<br />
Alloy Drive Gear<br />
[HW3045]<br />
M5x7<br />
Spacer x 2<br />
Counter Gear 55T<br />
[HI3040]<br />
Test fit the gear assembly into one half of the upper side frames.<br />
While holding the alloy drive gear, try to slide the counter gear<br />
up and down on the shaft. Adjust for as little vertical play as<br />
possible. It is normal and necessary to have a small amount of<br />
vertical play to allow for expansion due to heat during operation.<br />
A small amount of red locktight to the top of the counter shaft,<br />
between it and the pinion gear will make for a more secure fit.<br />
Only use blue locktite on the set screw. A small amount of the<br />
blue locktight can be applied carefully on the shaft between each<br />
bearings and the shaft. Warning Warning, Warning do not get any shaftlock in<br />
the bearing as damage to the bearing may result.<br />
Tail Transmission<br />
Output Shaft<br />
[HW3059]<br />
5x13 Ball<br />
Bearings x 2<br />
[CNBB1350]<br />
E - Ring<br />
M3x4 Set<br />
Screw (small<br />
key)<br />
5x13 Ball<br />
Bearings x 2<br />
[CNBB1350]<br />
Drive Shaft<br />
[HW3042]<br />
M2x12 Pin<br />
[HI3040]<br />
9