Hawk Sport Construction Manual
Hawk Sport Construction Manual
Hawk Sport Construction Manual

You also want an ePaper? Increase the reach of your titles
YUMPU automatically turns print PDFs into web optimized ePapers that Google loves.
Before Flying your <strong>Hawk</strong> <strong>Sport</strong> Helicopter<br />
Before each flight, check that all bolts and screws are tight. Simply flying your helicopter, may loosen any<br />
screws which were not threadlocked or secured with a lock nut.<br />
First First Flights Flights For the beginner pilot, a training pod is strongly recommended to assist in learning to<br />
hover the helicopter with substantially reduced risk of crashing. These systems provide the training capability<br />
to allow pilots to become familiar with the helicopter controls and how they relate to the behavior of the<br />
helicopter before actually leaving the ground.<br />
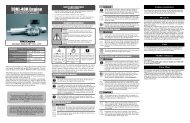
If If the the Engine Engine Does Does Not Not Start<br />
Start<br />
Q. Q. The engine does not turn easily with the starter.<br />
Starting Starting Your Your Your Engine<br />
Engine<br />
A. A. The starter battery may be too weak or the engine<br />
Fuel Fuel 15-30% Helicopter fuel is recommended is flooded. For flooding, remove the glow plug and<br />
as it contains more oil. Use a fuel filter between turn the engine over several times to clear the com-<br />
the fuel gallon and the heli to remove any dirt<br />
bustion chamber of fuel and retry.<br />
that could stall the engine. Fuel the helicopter<br />
Q. Q. The engine rotates and tries to start but doesn't.<br />
by removing the fuel line from the carburator<br />
A. A. The glow plug may be getting old. The glow plug<br />
and replace when finished.<br />
batteries are weak. The engine may not be getting<br />
Needle Needle Valve Valve Following the engine manufactur- enough fuel or too much fuel. The starter may be<br />
ers instructions, turn the main needle valve until turning the wrong direction.<br />
closed and open to the setting the instructions<br />
Q. Q. The engine just does not start.<br />
call for. Different engines will have different<br />
A. A. A. The glow plug may be burned out. Fuel may not<br />
settings.<br />
be getting to the engine, check for a clogged fuel<br />
Radio Radio Always turn the transmitter on first,<br />
line, dirt in the carburator or the main needle needs<br />
then the helicopter & gyro, When finished,<br />
to be opened out slightly.<br />
reverse the procedure, first turn off the heli &<br />
gyro, then the transmitter. If the radio acts<br />
erratically or intermittently, find the problem<br />
before starting the engine.<br />
Q. Q. The engine starts but immediately stops.<br />
A. A. There is a clog in the fuel line, the carburator<br />
barrel is not open enough at idle. Open the throttle<br />
trim by 1-2 clicks as the main needle is set too lean<br />
Glow Glow Plugs Plugs<br />
Plugs Remove the canopy (or use the<br />
Helicopter engines have a low speed needle which is<br />
optional remote glow plug connector) and connect factury set, beginners should not adjust it!!<br />
the 1.5V glow driver to heat the glow plug.<br />
Warning!! glow plugs operate at 1.5V not 12V.<br />
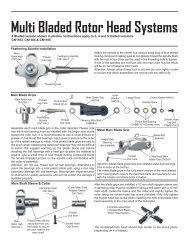
Adjusting Adjusting the the Blade Blade Blade Tracking<br />
Tracking<br />
Engine Engine Before starting the engine, check that the<br />
carb barrel is rotated to the idle setting and make<br />
sure the electric starter is turning in the counterclockwise<br />
direction.<br />
Pitch Pitch In steps 34-35 you set the pitch range using<br />
a pitch gauge and adjusting the radio and the pushrods<br />
on the servo horns to specific lengths. Once the<br />
helicopter is flying the pitch setting have to be fine<br />
tuned. Using appropriate training gear, increase the<br />
Starting Starting Starting If you do not already have a 6mm hex start<br />
wand, you will need the optional CN0426. Set the TX<br />
for low throttle with the trim centered. Holding the<br />
rotor head in one hand, insert the hex shaft into the<br />
coupler and press down slightly to engage the starting<br />
shaft into the fan. Engage the starter until the engine<br />
starts. If the engine does not start recheck all previous<br />
points. Remove the start wand using the two step<br />
system described on page 8. NOTE: The main blades<br />
should not turn until the engine RPM is above idle.<br />
Stopping Stopping To stop the engine, with the throttle stick<br />
in the low position, move the trim all the way to the<br />
low position.<br />
throttle until just before the helicopter lifts off. Sight<br />
the rotor disk from 15' back. If there appears to be 2<br />
rotor disks then adjust Pushrod C until only one disk<br />
appears. Using colored tape mark one blade so you<br />
can adjust the correct blade.<br />
37