Hawk Sport Construction Manual
Hawk Sport Construction Manual
Hawk Sport Construction Manual

You also want an ePaper? Increase the reach of your titles
YUMPU automatically turns print PDFs into web optimized ePapers that Google loves.
Hovering Hovering Hovering When all is set, ready and checked, attach your training gear/pod and start the engine.<br />
(1) Place the helicopter pointing into the wind and stand behind the model about 15' away - tail pointing to you.<br />
(2) Always watch the nose of the helicopter, move the rudder left and the nose should move left.<br />
(3) Start by increasing the throttle slowly until the helicopter rises 2-6 inches off the ground then set it back down.<br />
(4) Repeat this process until you become comfortable holding the model in the same spot for a few seconds. Then<br />
land and take a deep breath.<br />
When you become more comfortable, you can gradually increase altitude ( be very careful not to get too high ) as<br />
you are now just practising taking off and landing. This is the most basic but required skill to learn.<br />
Beyond Beyond Hovering Hovering<br />
Hovering<br />
It cannot be stressed enough that mastering the hovering skill is crucial to becoming a good helicopter pilot.<br />
As you progress in your learning, always practice hovering until you are completely comfortable in holding<br />
the helicopter in any position or altitude. Perfecting hovering enables you to more easily and safely move on<br />
to all the other types and styles of flying, from fast forward flight to loops and rolls to 3D aerobatics and<br />
anything you want to do with your HAWK <strong>Sport</strong> helicopter. The HAWK <strong>Sport</strong> can be set up for all of these<br />
various disciplines. Have fun!!<br />
Pre-Flight Pre-Flight Checklist Checklist<br />
Checklist<br />
1. After turning the radio on, move each servo separately, looking for unusual or excessive movement.<br />
2. Clean & lubricate the main shaft above the swashplate & the tail output shaft area of the pitch slider.<br />
3. Inspect the main and tail rotor grips for play or binding.<br />
4. Turn the main gear in both directions to feel if a problem is developing in the drive train.<br />
5. Check the glow plug and fuel lines for signs of wear.<br />
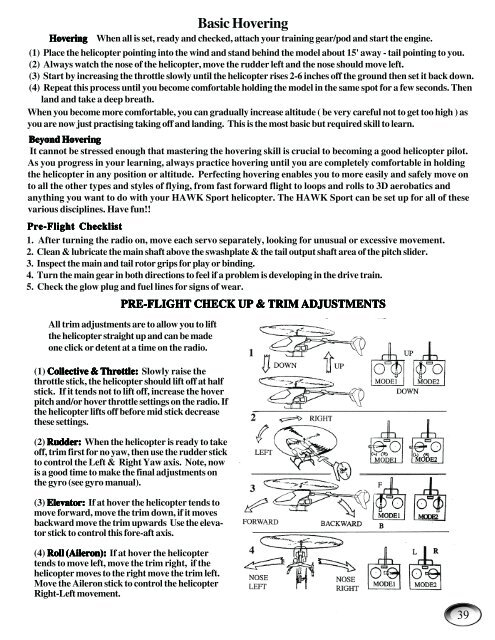
PRE-FLIGHT PRE-FLIGHT CHECK CHECK UP UP & & TRIM TRIM ADJUSTMENTS<br />
ADJUSTMENTS<br />
All trim adjustments are to allow you to lift<br />
the helicopter straight up and can be made<br />
one click or detent at a time on the radio.<br />
(1) Collective Collective & & & Throttle: Throttle:<br />
Throttle: Slowly raise the<br />
throttle stick, the helicopter should lift off at half<br />
stick. If it tends not to lift off, increase the hover<br />
pitch and/or hover throttle settings on the radio. If<br />
the helicopter lifts off before mid stick decrease<br />
these settings.<br />
(2) Rudder: Rudder: When the helicopter is ready to take<br />
off, trim first for no yaw, then use the rudder stick<br />
to control the Left & Right Yaw axis. Note, now<br />
is a good time to make the final adjustments on<br />
the gyro (see gyro manual).<br />
(3) Elevator: Elevator: Elevator: If at hover the helicopter tends to<br />
move forward, move the trim down, if it moves<br />
backward move the trim upwards Use the elevator<br />
stick to control this fore-aft axis.<br />
(4) Roll Roll (Aileron): (Aileron):<br />
(Aileron): If at hover the helicopter<br />
tends to move left, move the trim right, if the<br />
helicopter moves to the right move the trim left.<br />
Move the Aileron stick to control the helicopter<br />
Right-Left movement.<br />
Basic Hovering<br />
39