Deep Sky Imager™: The Basics - Meade
Deep Sky Imager™: The Basics - Meade
Deep Sky Imager™: The Basics - Meade
- TAGS
- deep
- basics
- meade
- www.meade.com

You also want an ePaper? Increase the reach of your titles
YUMPU automatically turns print PDFs into web optimized ePapers that Google loves.
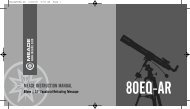
5. Select 2 stars<br />
<strong>The</strong> first star selected will be the shift star this is the position that will be shifted for subsequent images.<br />
This is also the star that will be used for telescope tracking. <strong>The</strong> second star is to determine the rotation<br />
angle from the first star. It is important to pick stars that are close to the center. Keep the selection within<br />
the middle third of the image, this way the telescope control will have maximum shift space. <strong>The</strong> telescope<br />
control will not shift the selected stars out of the image. When you run the images off line you can select<br />
different stars. If your telescope is polar mounted and well aligned you can use a single star, this will give<br />
you the maximum field of view possible.<br />
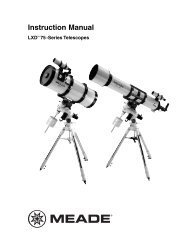
6. Press Start<br />
Envisage will create a new tab and put<br />
the drizzled image there. Be patient,<br />
depending on your Drizzle settings and<br />
the speed of your computer it may take<br />
2030 seconds after the count down for<br />
the first image to appear. <strong>The</strong> image<br />
may be bigger than your screen, in this<br />
case scroll bars will appear on the right<br />
and bottom.<br />
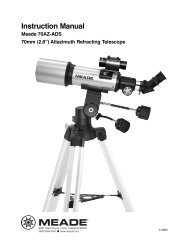
7. Telescope Tracking<br />
If you select the live image you will see<br />
your selected stars and a yellow circle<br />
with a cross. This is the target position.<br />
If your star was on the yellow cross<br />
when Start was pressed then the<br />
yellow cross will be in the upper right<br />
corner.<br />
More....<br />
Drizzle Tutorials 2<br />
41