Rég<strong>la</strong>ge du mo<strong>de</strong> MX du processeuraudio externeAvant d’exécuter <strong>le</strong>s opérations ci-<strong>de</strong>ss<strong>ou</strong>s, rég<strong>le</strong>z <strong>le</strong> mo<strong>de</strong> MX (MediaXpan<strong>de</strong>r) du PXA-H700 <strong>sur</strong> « AUTO » lorsque celui-ci est raccordé.1 As<strong>sur</strong>ez-v<strong>ou</strong>s que <strong>le</strong> mo<strong>de</strong> Defeat est désactivé(page 12).2 <strong>Appuyez</strong> <strong>sur</strong> TA/RTN/SETUP pendant au moins2 secon<strong>de</strong>s.L’écran SETUP s’affiche.3 <strong>Appuyez</strong> <strong>sur</strong> <strong>le</strong> <strong>b<strong>ou</strong>ton</strong> supérieur <strong>ou</strong> inférieur <strong>de</strong> <strong>la</strong>comman<strong>de</strong> multidirectionnel<strong>le</strong> p<strong>ou</strong>rsé<strong>le</strong>ctionner AP SETUP, puis appuyez <strong>sur</strong> <strong>le</strong> <strong>b<strong>ou</strong>ton</strong>droit <strong>de</strong> <strong>la</strong> comman<strong>de</strong> multidirectionnel<strong>le</strong>.L’écran AP SETUP s’affiche.4 <strong>Appuyez</strong> <strong>sur</strong> <strong>le</strong> <strong>b<strong>ou</strong>ton</strong> supérieur <strong>ou</strong> inférieur <strong>de</strong> <strong>la</strong>comman<strong>de</strong> multidirectionnel<strong>le</strong> p<strong>ou</strong>rsé<strong>le</strong>ctionner MX, puis appuyez <strong>sur</strong> <strong>le</strong> <strong>b<strong>ou</strong>ton</strong> droit<strong>ou</strong> gauche <strong>de</strong> <strong>la</strong> comman<strong>de</strong> multidirectionnel<strong>le</strong>p<strong>ou</strong>r sé<strong>le</strong>ctionner ON.5 <strong>Appuyez</strong> <strong>sur</strong> <strong>le</strong> <strong>b<strong>ou</strong>ton</strong> supérieur <strong>ou</strong> inférieur <strong>de</strong> <strong>la</strong>comman<strong>de</strong> multidirectionnel<strong>le</strong> p<strong>ou</strong>r sé<strong>le</strong>ctionnerMX SETUP, puis appuyez <strong>sur</strong> <strong>le</strong> <strong>b<strong>ou</strong>ton</strong> droit <strong>de</strong> <strong>la</strong>comman<strong>de</strong> multidirectionnel<strong>le</strong>.6 <strong>Appuyez</strong> <strong>sur</strong> <strong>le</strong> <strong>b<strong>ou</strong>ton</strong> supérieur <strong>ou</strong> inférieur <strong>de</strong> <strong>la</strong>comman<strong>de</strong> multifonctionnel<strong>le</strong> p<strong>ou</strong>r sé<strong>le</strong>ctionner<strong>le</strong> support qui est en c<strong>ou</strong>rs <strong>de</strong> <strong>le</strong>cture. <strong>Appuyez</strong>ensuite <strong>sur</strong> <strong>le</strong> <strong>b<strong>ou</strong>ton</strong> gauche <strong>ou</strong> droit <strong>de</strong> <strong>la</strong>comman<strong>de</strong> multifonctionnel<strong>le</strong> p<strong>ou</strong>r rég<strong>le</strong>r <strong>le</strong>mo<strong>de</strong> MX s<strong>ou</strong>haité.MX CD (OFF, CD 1 à 3)Le mo<strong>de</strong> CD traite <strong>de</strong> gran<strong>de</strong>s quantités <strong>de</strong> données. Cesdonnées servent à reproduire c<strong>la</strong>irement <strong>le</strong> son <strong>sur</strong> base <strong>de</strong> <strong>la</strong>quantité <strong>de</strong> données.MX COMPM (OFF, CMPM 1 à 3)Ce rég<strong>la</strong>ge corrige <strong>le</strong>s informations omises lors <strong>de</strong> <strong>la</strong>compression. Ce<strong>la</strong> permet <strong>de</strong> reproduire un son parfaitementéquilibré, proche <strong>de</strong> l’original.MX FM (OFF, FM 1 à 3)Ce rég<strong>la</strong>ge produit <strong>de</strong>s sons <strong>de</strong> fréquences moyennes à hautesavec plus <strong>de</strong> c<strong>la</strong>rté et produit <strong>de</strong>s sons bien équilibrés <strong>sur</strong>t<strong>ou</strong>tes <strong>le</strong>s gammes d’on<strong>de</strong>s.MX DVD (OFF, MOVIE 1 à 2)Ce rég<strong>la</strong>ge reproduit plus c<strong>la</strong>irement <strong>la</strong> partie <strong>de</strong>s dialogues dufilm.(MUSIC)Ce disque contient une gran<strong>de</strong> quantité <strong>de</strong> données, tel<strong>le</strong>squ’une vidéo musica<strong>le</strong>. MX utilise ces données p<strong>ou</strong>r reproduire<strong>le</strong> son <strong>de</strong> façon précise.MX AUX 1 à 3 (OFF, CMPM, MOVIE, MUSIC)Sé<strong>le</strong>ctionnez <strong>le</strong> mo<strong>de</strong> MX (CMPM, MUSIC <strong>ou</strong> MOVIE) quicorrespond au support connecté.7 <strong>Appuyez</strong> <strong>sur</strong> TA/RTN/SETUP p<strong>ou</strong>r revenir à l’écranprécé<strong>de</strong>nt.• Le contenu du mo<strong>de</strong> MX réglé ici est reflété vers <strong>le</strong> PXA-H700 <strong>ou</strong>PXA-H701.• La sé<strong>le</strong>ction du rég<strong>la</strong>ge OFF désactive l’effet MX <strong>de</strong> chaque mo<strong>de</strong> MX.• Chaque s<strong>ou</strong>rce <strong>de</strong> musique, notamment <strong>la</strong> radio, <strong>le</strong> CD et <strong>le</strong> MP3,peut possé<strong>de</strong>r son propre rég<strong>la</strong>ge MX.• Le mo<strong>de</strong> MX ne fonctionne pas lorsque MX est réglé <strong>sur</strong> ON p<strong>ou</strong>r <strong>la</strong>radio MW, LW.• MX COMPM s’applique p<strong>ou</strong>r MP3/WMA, MMD et iPod.• Le mo<strong>de</strong> MX ne peut être réglé que p<strong>ou</strong>r <strong>le</strong> support en c<strong>ou</strong>rs <strong>de</strong> <strong>le</strong>cture.• AUX3 ne peut être réglé que si <strong>le</strong> boîtier d’expansion VPE-S431 enoption est raccordé.Rég<strong>la</strong>ge du mo<strong>de</strong> X-OVER1 As<strong>sur</strong>ez-v<strong>ou</strong>s que <strong>le</strong> mo<strong>de</strong> Defeat est désactivé(page 12).2 <strong>Appuyez</strong> <strong>sur</strong> TA/RTN/SETUP pendant au moins2 secon<strong>de</strong>s.L’écran SETUP s’affiche.3 <strong>Appuyez</strong> <strong>sur</strong> <strong>le</strong> <strong>b<strong>ou</strong>ton</strong> supérieur <strong>ou</strong> inférieur <strong>de</strong> <strong>la</strong>comman<strong>de</strong> multidirectionnel<strong>le</strong> p<strong>ou</strong>rsé<strong>le</strong>ctionner AP SETUP, puis appuyez <strong>sur</strong> <strong>le</strong> <strong>b<strong>ou</strong>ton</strong>droit <strong>de</strong> <strong>la</strong> comman<strong>de</strong> multidirectionnel<strong>le</strong>.L’écran AP SETUP s’affiche.4 <strong>Appuyez</strong> <strong>sur</strong> <strong>le</strong> <strong>b<strong>ou</strong>ton</strong> supérieur <strong>ou</strong> inférieur <strong>de</strong> <strong>la</strong>comman<strong>de</strong> multidirectionnel<strong>le</strong> p<strong>ou</strong>rsé<strong>le</strong>ctionner X-OVER.5 <strong>Appuyez</strong> <strong>sur</strong> <strong>le</strong> <strong>b<strong>ou</strong>ton</strong> gauche <strong>ou</strong> droit <strong>de</strong> <strong>la</strong>comman<strong>de</strong> multidirectionnel<strong>le</strong> p<strong>ou</strong>rsé<strong>le</strong>ctionner L/R <strong>ou</strong> L+R.6 <strong>Appuyez</strong> <strong>sur</strong> <strong>le</strong> <strong>b<strong>ou</strong>ton</strong> supérieur <strong>ou</strong> inférieur <strong>de</strong> <strong>la</strong>comman<strong>de</strong> multidirectionnel<strong>le</strong> p<strong>ou</strong>rsé<strong>le</strong>ctionner X-OVER SETUP, puis appuyez <strong>sur</strong> <strong>le</strong><strong>b<strong>ou</strong>ton</strong> droit <strong>de</strong> <strong>la</strong> comman<strong>de</strong>multidirectionnel<strong>le</strong>.7 <strong>Appuyez</strong> <strong>sur</strong> <strong>le</strong> <strong>b<strong>ou</strong>ton</strong> supérieur <strong>ou</strong> inférieur <strong>de</strong> <strong>la</strong>comman<strong>de</strong> multidirectionnel<strong>le</strong> p<strong>ou</strong>rsé<strong>le</strong>ctionner l’enceinte <strong>de</strong> votre choix, puis appuyez<strong>sur</strong> <strong>le</strong> <strong>b<strong>ou</strong>ton</strong> droit <strong>de</strong> <strong>la</strong> comman<strong>de</strong>multidirectionnel<strong>le</strong>.8 <strong>Appuyez</strong> <strong>sur</strong> <strong>le</strong> <strong>b<strong>ou</strong>ton</strong> supérieur <strong>ou</strong> inférieur <strong>de</strong> <strong>la</strong>comman<strong>de</strong> multidirectionnel<strong>le</strong> p<strong>ou</strong>rsé<strong>le</strong>ctionner l’élément <strong>de</strong> votre choix, puis appuyez<strong>sur</strong> <strong>le</strong> <strong>b<strong>ou</strong>ton</strong> droit <strong>ou</strong> gauche <strong>de</strong> <strong>la</strong> comman<strong>de</strong>multidirectionnel<strong>le</strong> p<strong>ou</strong>r rég<strong>le</strong>r <strong>le</strong> répartiteur.FREQUENCY : permet <strong>de</strong> rég<strong>le</strong>r <strong>la</strong> fréquence <strong>de</strong> référence dufiltre passe-haut et du filtre passe-bas.Les gammes d’on<strong>de</strong>s p<strong>ou</strong>vant être régléesvarient en fonction du canal (enceinte).LEVEL : permet <strong>de</strong> rég<strong>le</strong>r <strong>le</strong> niveau du filtre passe-haut<strong>ou</strong> du filtre passe-bas.Niveau rég<strong>la</strong>b<strong>le</strong> : -13 à 0SLOPE : permet <strong>de</strong> rég<strong>le</strong>r <strong>la</strong> pente du filtre passe-haut<strong>ou</strong> du filtre passe-bas.Pente rég<strong>la</strong>b<strong>le</strong> : OFF/-6/-12/-18/-24/-30P<strong>ou</strong>r rég<strong>le</strong>r d’autres canaux, répétez <strong>le</strong>s étapes 7 et 8.9 <strong>Appuyez</strong> <strong>sur</strong> TA/RTN/SETUP p<strong>ou</strong>r revenir à l’écranprécé<strong>de</strong>nt.• Lorsque l’enceinte est réglée <strong>sur</strong> <strong>le</strong> mo<strong>de</strong> « OFF », il v<strong>ou</strong>s seraimpossib<strong>le</strong> <strong>de</strong> configurer <strong>le</strong> X-OVER p<strong>ou</strong>r cette enceinte. Reportezv<strong>ou</strong>sà <strong>la</strong> section « Rég<strong>la</strong>ge <strong>de</strong>s enceintes » (page 32).• Contrô<strong>le</strong>z <strong>le</strong>s fréquences <strong>de</strong> <strong>le</strong>cture <strong>de</strong>s enceintes connectées avant<strong>de</strong> procé<strong>de</strong>r au rég<strong>la</strong>ge.• P<strong>ou</strong>r protéger <strong>le</strong>s enceintes, il n’est pas possib<strong>le</strong> <strong>de</strong> désactiver (OFF)<strong>le</strong> filtre passe-bas du subwoofer (<strong>la</strong> pente <strong>de</strong>meure inchangée).• Le filtre H.P.F ne peut pas être désactivé (pente OFF) si v<strong>ou</strong>ssé<strong>le</strong>ctionnez TW (tweeter) p<strong>ou</strong>r FRONT1.33-FR
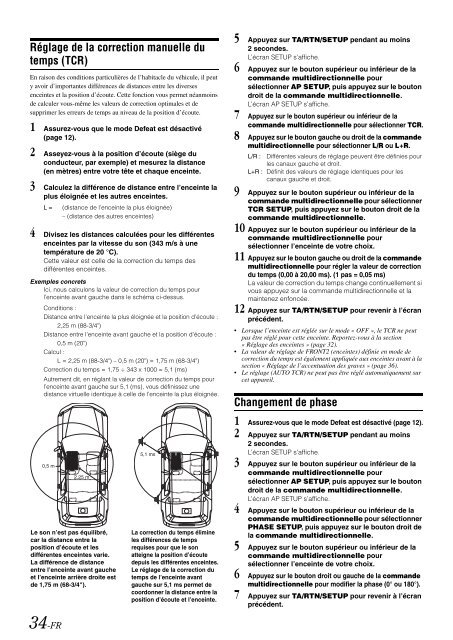
Rég<strong>la</strong>ge <strong>de</strong> <strong>la</strong> correction manuel<strong>le</strong> dutemps (TCR)En raison <strong>de</strong>s conditions particulières <strong>de</strong> l’habitac<strong>le</strong> du véhicu<strong>le</strong>, il peuty avoir d’importantes différences <strong>de</strong> distances entre <strong>le</strong>s diversesenceintes et <strong>la</strong> position d’éc<strong>ou</strong>te. Cette fonction v<strong>ou</strong>s permet néanmoins<strong>de</strong> calcu<strong>le</strong>r v<strong>ou</strong>s-même <strong>le</strong>s va<strong>le</strong>urs <strong>de</strong> correction optima<strong>le</strong>s et <strong>de</strong>supprimer <strong>le</strong>s erreurs <strong>de</strong> temps au niveau <strong>de</strong> <strong>la</strong> position d’éc<strong>ou</strong>te.1 As<strong>sur</strong>ez-v<strong>ou</strong>s que <strong>le</strong> mo<strong>de</strong> Defeat est désactivé(page 12).2 Asseyez-v<strong>ou</strong>s à <strong>la</strong> position d’éc<strong>ou</strong>te (siège duconducteur, par exemp<strong>le</strong>) et me<strong>sur</strong>ez <strong>la</strong> distance(en mètres) entre votre tête et chaque enceinte.3 Calcu<strong>le</strong>z <strong>la</strong> différence <strong>de</strong> distance entre l’enceinte <strong>la</strong>plus éloignée et <strong>le</strong>s autres enceintes.L =(distance <strong>de</strong> l’enceinte <strong>la</strong> plus éloignée)– (distance <strong>de</strong>s autres enceintes)4 Divisez <strong>le</strong>s distances calculées p<strong>ou</strong>r <strong>le</strong>s différentesenceintes par <strong>la</strong> vitesse du son (343 m/s à unetempérature <strong>de</strong> 20 °C).Cette va<strong>le</strong>ur est cel<strong>le</strong> <strong>de</strong> <strong>la</strong> correction du temps <strong>de</strong>sdifférentes enceintes.Exemp<strong>le</strong>s concretsIci, n<strong>ou</strong>s calculons <strong>la</strong> va<strong>le</strong>ur <strong>de</strong> correction du temps p<strong>ou</strong>rl’enceinte avant gauche dans <strong>le</strong> schéma ci-<strong>de</strong>ssus.Conditions :Distance entre l’enceinte <strong>la</strong> plus éloignée et <strong>la</strong> position d’éc<strong>ou</strong>te :2,25 m (88-3/4")Distance entre l’enceinte avant gauche et <strong>la</strong> position d’éc<strong>ou</strong>te :0,5 m (20")Calcul :L = 2,25 m (88-3/4") – 0,5 m (20") = 1,75 m (68-3/4")Correction du temps = 1,75 ÷ 343 x 1000 = 5,1 (ms)Autrement dit, en rég<strong>la</strong>nt <strong>la</strong> va<strong>le</strong>ur <strong>de</strong> correction du temps p<strong>ou</strong>rl’enceinte avant gauche <strong>sur</strong> 5,1 (ms), v<strong>ou</strong>s définissez unedistance virtuel<strong>le</strong> i<strong>de</strong>ntique à cel<strong>le</strong> <strong>de</strong> l’enceinte <strong>la</strong> plus éloignée.5 <strong>Appuyez</strong> <strong>sur</strong> TA/RTN/SETUP pendant au moins2 secon<strong>de</strong>s.L’écran SETUP s’affiche.6 <strong>Appuyez</strong> <strong>sur</strong> <strong>le</strong> <strong>b<strong>ou</strong>ton</strong> supérieur <strong>ou</strong> inférieur <strong>de</strong> <strong>la</strong>comman<strong>de</strong> multidirectionnel<strong>le</strong> p<strong>ou</strong>rsé<strong>le</strong>ctionner AP SETUP, puis appuyez <strong>sur</strong> <strong>le</strong> <strong>b<strong>ou</strong>ton</strong>droit <strong>de</strong> <strong>la</strong> comman<strong>de</strong> multidirectionnel<strong>le</strong>.L’écran AP SETUP s’affiche.7 <strong>Appuyez</strong> <strong>sur</strong> <strong>le</strong> <strong>b<strong>ou</strong>ton</strong> supérieur <strong>ou</strong> inférieur <strong>de</strong> <strong>la</strong>comman<strong>de</strong> multidirectionnel<strong>le</strong> p<strong>ou</strong>r sé<strong>le</strong>ctionner TCR.8 <strong>Appuyez</strong> <strong>sur</strong> <strong>le</strong> <strong>b<strong>ou</strong>ton</strong> gauche <strong>ou</strong> droit <strong>de</strong> <strong>la</strong> comman<strong>de</strong>multidirectionnel<strong>le</strong> p<strong>ou</strong>r sé<strong>le</strong>ctionner L/R <strong>ou</strong> L+R.L/R :Différentes va<strong>le</strong>urs <strong>de</strong> rég<strong>la</strong>ge peuvent être définies p<strong>ou</strong>r<strong>le</strong>s canaux gauche et droit.L+R : Définit <strong>de</strong>s va<strong>le</strong>urs <strong>de</strong> rég<strong>la</strong>ge i<strong>de</strong>ntiques p<strong>ou</strong>r <strong>le</strong>scanaux gauche et droit.9 <strong>Appuyez</strong> <strong>sur</strong> <strong>le</strong> <strong>b<strong>ou</strong>ton</strong> supérieur <strong>ou</strong> inférieur <strong>de</strong> <strong>la</strong>comman<strong>de</strong> multidirectionnel<strong>le</strong> p<strong>ou</strong>r sé<strong>le</strong>ctionnerTCR SETUP, puis appuyez <strong>sur</strong> <strong>le</strong> <strong>b<strong>ou</strong>ton</strong> droit <strong>de</strong> <strong>la</strong>comman<strong>de</strong> multidirectionnel<strong>le</strong>.10 <strong>Appuyez</strong> <strong>sur</strong> <strong>le</strong> <strong>b<strong>ou</strong>ton</strong> supérieur <strong>ou</strong> inférieur <strong>de</strong> <strong>la</strong>comman<strong>de</strong> multidirectionnel<strong>le</strong> p<strong>ou</strong>rsé<strong>le</strong>ctionner l’enceinte <strong>de</strong> votre choix.11 <strong>Appuyez</strong> <strong>sur</strong> <strong>le</strong> <strong>b<strong>ou</strong>ton</strong> gauche <strong>ou</strong> droit <strong>de</strong> <strong>la</strong> comman<strong>de</strong>multidirectionnel<strong>le</strong> p<strong>ou</strong>r rég<strong>le</strong>r <strong>la</strong> va<strong>le</strong>ur <strong>de</strong> correctiondu temps (0,00 à 20,00 ms). (1 pas = 0,05 ms)La va<strong>le</strong>ur <strong>de</strong> correction du temps change continuel<strong>le</strong>ment siv<strong>ou</strong>s appuyez <strong>sur</strong> <strong>la</strong> comman<strong>de</strong> multidirectionnel<strong>le</strong> et <strong>la</strong>maintenez enfoncée.12 <strong>Appuyez</strong> <strong>sur</strong> TA/RTN/SETUP p<strong>ou</strong>r revenir à l’écranprécé<strong>de</strong>nt.• Lorsque l’enceinte est réglée <strong>sur</strong> <strong>le</strong> mo<strong>de</strong> « OFF », <strong>le</strong> TCR ne peutpas être réglé p<strong>ou</strong>r cette enceinte. Reportez-v<strong>ou</strong>s à <strong>la</strong> section« Rég<strong>la</strong>ge <strong>de</strong>s enceintes » (page 32).• La va<strong>le</strong>ur <strong>de</strong> rég<strong>la</strong>ge <strong>de</strong> FRONT2 (enceintes) définie en mo<strong>de</strong> <strong>de</strong>correction du temps est éga<strong>le</strong>ment appliquée aux enceintes avant à <strong>la</strong>section « Rég<strong>la</strong>ge <strong>de</strong> l’accentuation <strong>de</strong>s graves » (page 36).• Le rég<strong>la</strong>ge (AUTO TCR) ne peut pas être réglé automatiquement <strong>sur</strong>cet appareil.Changement <strong>de</strong> phase0,5 m34-FR2,25 mLe son n’est pas équilibré,car <strong>la</strong> distance entre <strong>la</strong>position d’éc<strong>ou</strong>te et <strong>le</strong>sdifférentes enceintes varie.La différence <strong>de</strong> distanceentre l’enceinte avant gaucheet l’enceinte arrière droite est<strong>de</strong> 1,75 m (68-3/4").5,1 msLa correction du temps élimine<strong>le</strong>s différences <strong>de</strong> tempsrequises p<strong>ou</strong>r que <strong>le</strong> sonatteigne <strong>la</strong> position d’éc<strong>ou</strong>te<strong>de</strong>puis <strong>le</strong>s différentes enceintes.Le rég<strong>la</strong>ge <strong>de</strong> <strong>la</strong> correction dutemps <strong>de</strong> l’enceinte avantgauche <strong>sur</strong> 5,1 ms permet <strong>de</strong>coordonner <strong>la</strong> distance entre <strong>la</strong>position d’éc<strong>ou</strong>te et l’enceinte.1 As<strong>sur</strong>ez-v<strong>ou</strong>s que <strong>le</strong> mo<strong>de</strong> Defeat est désactivé (page 12).2 <strong>Appuyez</strong> <strong>sur</strong> TA/RTN/SETUP pendant au moins2 secon<strong>de</strong>s.L’écran SETUP s’affiche.3 <strong>Appuyez</strong> <strong>sur</strong> <strong>le</strong> <strong>b<strong>ou</strong>ton</strong> supérieur <strong>ou</strong> inférieur <strong>de</strong> <strong>la</strong>comman<strong>de</strong> multidirectionnel<strong>le</strong> p<strong>ou</strong>rsé<strong>le</strong>ctionner AP SETUP, puis appuyez <strong>sur</strong> <strong>le</strong> <strong>b<strong>ou</strong>ton</strong>droit <strong>de</strong> <strong>la</strong> comman<strong>de</strong> multidirectionnel<strong>le</strong>.L’écran AP SETUP s’affiche.4 <strong>Appuyez</strong> <strong>sur</strong> <strong>le</strong> <strong>b<strong>ou</strong>ton</strong> supérieur <strong>ou</strong> inférieur <strong>de</strong> <strong>la</strong>comman<strong>de</strong> multidirectionnel<strong>le</strong> p<strong>ou</strong>r sé<strong>le</strong>ctionnerPHASE SETUP, puis appuyez <strong>sur</strong> <strong>le</strong> <strong>b<strong>ou</strong>ton</strong> droit <strong>de</strong><strong>la</strong> comman<strong>de</strong> multidirectionnel<strong>le</strong>.5 <strong>Appuyez</strong> <strong>sur</strong> <strong>le</strong> <strong>b<strong>ou</strong>ton</strong> supérieur <strong>ou</strong> inférieur <strong>de</strong> <strong>la</strong>comman<strong>de</strong> multidirectionnel<strong>le</strong> p<strong>ou</strong>rsé<strong>le</strong>ctionner l’enceinte <strong>de</strong> votre choix.6 <strong>Appuyez</strong> <strong>sur</strong> <strong>le</strong> <strong>b<strong>ou</strong>ton</strong> droit <strong>ou</strong> gauche <strong>de</strong> <strong>la</strong> comman<strong>de</strong>multidirectionnel<strong>le</strong> p<strong>ou</strong>r modifier <strong>la</strong> phase (0° <strong>ou</strong> 180°).7 <strong>Appuyez</strong> <strong>sur</strong> TA/RTN/SETUP p<strong>ou</strong>r revenir à l’écranprécé<strong>de</strong>nt.