2 Appuyez sur le bouton supérieur ou inférieur de la - Alpine Europe
2 Appuyez sur le bouton supérieur ou inférieur de la - Alpine Europe
2 Appuyez sur le bouton supérieur ou inférieur de la - Alpine Europe
You also want an ePaper? Increase the reach of your titles
YUMPU automatically turns print PDFs into web optimized ePapers that Google loves.
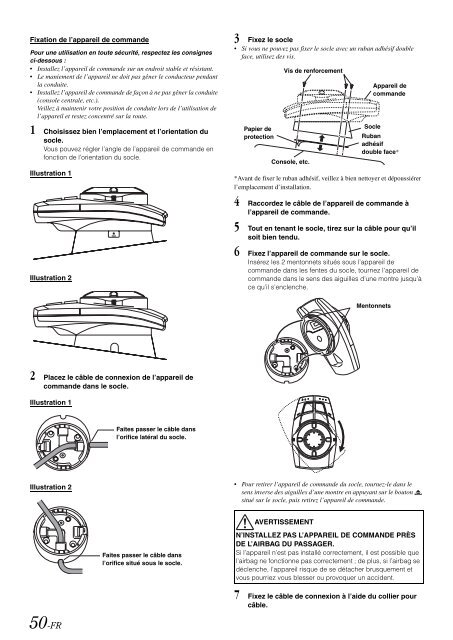
Fixation <strong>de</strong> l’appareil <strong>de</strong> comman<strong>de</strong>P<strong>ou</strong>r une utilisation en t<strong>ou</strong>te sécurité, respectez <strong>le</strong>s consignesci-<strong>de</strong>ss<strong>ou</strong>s :• Instal<strong>le</strong>z l’appareil <strong>de</strong> comman<strong>de</strong> <strong>sur</strong> un endroit stab<strong>le</strong> et résistant.• Le maniement <strong>de</strong> l’appareil ne doit pas gêner <strong>le</strong> conducteur pendant<strong>la</strong> conduite.• Instal<strong>le</strong>z l’appareil <strong>de</strong> comman<strong>de</strong> <strong>de</strong> façon à ne pas gêner <strong>la</strong> conduite(conso<strong>le</strong> centra<strong>le</strong>, etc.).Veil<strong>le</strong>z à maintenir votre position <strong>de</strong> conduite lors <strong>de</strong> l’utilisation <strong>de</strong>l’appareil et restez concentré <strong>sur</strong> <strong>la</strong> r<strong>ou</strong>te.1 Choisissez bien l’emp<strong>la</strong>cement et l’orientation dusoc<strong>le</strong>.V<strong>ou</strong>s p<strong>ou</strong>vez rég<strong>le</strong>r l’ang<strong>le</strong> <strong>de</strong> l’appareil <strong>de</strong> comman<strong>de</strong> enfonction <strong>de</strong> l’orientation du soc<strong>le</strong>.Illustration 1Illustration 23 Fixez <strong>le</strong> soc<strong>le</strong>• Si v<strong>ou</strong>s ne p<strong>ou</strong>vez pas fixer <strong>le</strong> soc<strong>le</strong> avec un ruban adhésif d<strong>ou</strong>b<strong>le</strong>face, utilisez <strong>de</strong>s vis.Papier <strong>de</strong>protectionVis <strong>de</strong> renforcementConso<strong>le</strong>, etc.Appareil <strong>de</strong>comman<strong>de</strong>Soc<strong>le</strong>Rubanadhésifd<strong>ou</strong>b<strong>le</strong> face**Avant <strong>de</strong> fixer <strong>le</strong> ruban adhésif, veil<strong>le</strong>z à bien nettoyer et dép<strong>ou</strong>ssiérerl’emp<strong>la</strong>cement d’instal<strong>la</strong>tion.4 Raccor<strong>de</strong>z <strong>le</strong> câb<strong>le</strong> <strong>de</strong> l’appareil <strong>de</strong> comman<strong>de</strong> àl’appareil <strong>de</strong> comman<strong>de</strong>.5 T<strong>ou</strong>t en tenant <strong>le</strong> soc<strong>le</strong>, tirez <strong>sur</strong> <strong>la</strong> câb<strong>le</strong> p<strong>ou</strong>r qu’ilsoit bien tendu.6 Fixez l’appareil <strong>de</strong> comman<strong>de</strong> <strong>sur</strong> <strong>le</strong> soc<strong>le</strong>.Insérez <strong>le</strong>s 2 mentonnets situés s<strong>ou</strong>s l’appareil <strong>de</strong>comman<strong>de</strong> dans <strong>le</strong>s fentes du soc<strong>le</strong>, t<strong>ou</strong>rnez l’appareil <strong>de</strong>comman<strong>de</strong> dans <strong>le</strong> sens <strong>de</strong>s aiguil<strong>le</strong>s d’une montre jusqu’àce qu’il s’enc<strong>le</strong>nche.Mentonnets2 P<strong>la</strong>cez <strong>le</strong> câb<strong>le</strong> <strong>de</strong> connexion <strong>de</strong> l’appareil <strong>de</strong>comman<strong>de</strong> dans <strong>le</strong> soc<strong>le</strong>.Illustration 1Faites passer <strong>le</strong> câb<strong>le</strong> dansl’orifice <strong>la</strong>téral du soc<strong>le</strong>.Illustration 2• P<strong>ou</strong>r retirer l’appareil <strong>de</strong> comman<strong>de</strong> du soc<strong>le</strong>, t<strong>ou</strong>rnez-<strong>le</strong> dans <strong>le</strong>sens inverse <strong>de</strong>s aiguil<strong>le</strong>s d’une montre en appuyant <strong>sur</strong> <strong>le</strong> <strong>b<strong>ou</strong>ton</strong>situé <strong>sur</strong> <strong>le</strong> soc<strong>le</strong>, puis retirez l’appareil <strong>de</strong> comman<strong>de</strong>.AVERTISSEMENTFaites passer <strong>le</strong> câb<strong>le</strong> dansl’orifice situé s<strong>ou</strong>s <strong>le</strong> soc<strong>le</strong>.N’INSTALLEZ PAS L’APPAREIL DE COMMANDE PRÈSDE L’AIRBAG DU PASSAGER.Si l’appareil n’est pas installé correctement, il est possib<strong>le</strong> quel’airbag ne fonctionne pas correctement ; <strong>de</strong> plus, si l’airbag sedéc<strong>le</strong>nche, l’appareil risque <strong>de</strong> se détacher brusquement etv<strong>ou</strong>s p<strong>ou</strong>rriez v<strong>ou</strong>s b<strong>le</strong>sser <strong>ou</strong> provoquer un acci<strong>de</strong>nt.7 Fixez <strong>le</strong> câb<strong>le</strong> <strong>de</strong> connexion à l’ai<strong>de</strong> du collier p<strong>ou</strong>rcâb<strong>le</strong>.50-FR


