2 Appuyez sur le bouton supérieur ou inférieur de la - Alpine Europe
2 Appuyez sur le bouton supérieur ou inférieur de la - Alpine Europe
2 Appuyez sur le bouton supérieur ou inférieur de la - Alpine Europe

You also want an ePaper? Increase the reach of your titles
YUMPU automatically turns print PDFs into web optimized ePapers that Google loves.
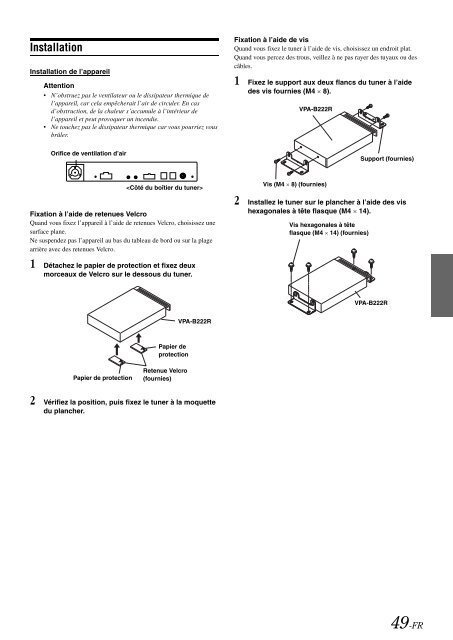
Instal<strong>la</strong>tionInstal<strong>la</strong>tion <strong>de</strong> l’appareilAttention• N’obstruez pas <strong>le</strong> venti<strong>la</strong>teur <strong>ou</strong> <strong>le</strong> dissipateur thermique <strong>de</strong>l’appareil, car ce<strong>la</strong> empêcherait l’air <strong>de</strong> circu<strong>le</strong>r. En casd’obstruction, <strong>de</strong> <strong>la</strong> cha<strong>le</strong>ur s’accumu<strong>le</strong> à l’intérieur <strong>de</strong>l’appareil et peut provoquer un incendie.• Ne t<strong>ou</strong>chez pas <strong>le</strong> dissipateur thermique car v<strong>ou</strong>s p<strong>ou</strong>rriez v<strong>ou</strong>sbrû<strong>le</strong>r.Fixation à l’ai<strong>de</strong> <strong>de</strong> visQuand v<strong>ou</strong>s fixez <strong>le</strong> tuner à l’ai<strong>de</strong> <strong>de</strong> vis, choisissez un endroit p<strong>la</strong>t.Quand v<strong>ou</strong>s percez <strong>de</strong>s tr<strong>ou</strong>s, veil<strong>le</strong>z à ne pas rayer <strong>de</strong>s tuyaux <strong>ou</strong> <strong>de</strong>scâb<strong>le</strong>s.1 Fixez <strong>le</strong> support aux <strong>de</strong>ux f<strong>la</strong>ncs du tuner à l’ai<strong>de</strong><strong>de</strong>s vis f<strong>ou</strong>rnies (M4 × 8).VPA-B222ROrifice <strong>de</strong> venti<strong>la</strong>tion d’airSupport (f<strong>ou</strong>rnies)Fixation à l’ai<strong>de</strong> <strong>de</strong> retenues VelcroQuand v<strong>ou</strong>s fixez l’appareil à l’ai<strong>de</strong> <strong>de</strong> retenues Velcro, choisissez une<strong>sur</strong>face p<strong>la</strong>ne.Ne suspen<strong>de</strong>z pas l’appareil au bas du tab<strong>le</strong>au <strong>de</strong> bord <strong>ou</strong> <strong>sur</strong> <strong>la</strong> p<strong>la</strong>gearrière avec <strong>de</strong>s retenues Velcro.1 Détachez <strong>le</strong> papier <strong>de</strong> protection et fixez <strong>de</strong>uxmorceaux <strong>de</strong> Velcro <strong>sur</strong> <strong>le</strong> <strong>de</strong>ss<strong>ou</strong>s du tuner.Vis (M4 × 8) (f<strong>ou</strong>rnies)2 Instal<strong>le</strong>z <strong>le</strong> tuner <strong>sur</strong> <strong>le</strong> p<strong>la</strong>ncher à l’ai<strong>de</strong> <strong>de</strong>s vishexagona<strong>le</strong>s à tête f<strong>la</strong>sque (M4 × 14).Vis hexagona<strong>le</strong>s à têtef<strong>la</strong>sque (M4 × 14) (f<strong>ou</strong>rnies)VPA-B222RVPA-B222RPapier <strong>de</strong>protectionPapier <strong>de</strong> protectionRetenue Velcro(f<strong>ou</strong>rnies)2 Vérifiez <strong>la</strong> position, puis fixez <strong>le</strong> tuner à <strong>la</strong> moquettedu p<strong>la</strong>ncher.49-FR