Português - Philips
Português - Philips
Português - Philips

Create successful ePaper yourself
Turn your PDF publications into a flip-book with our unique Google optimized e-Paper software.
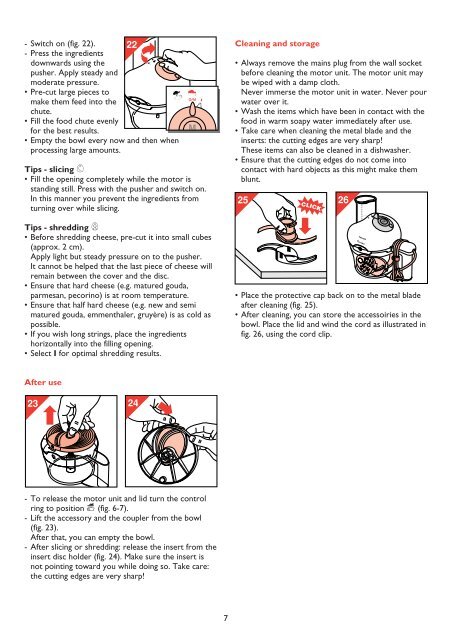
- Switch on (fig. 22). 22<br />
- Press the ingredients<br />
downwards using the<br />
pusher. Apply steady and<br />
moderate pressure.<br />
• Pre-cut large pieces to<br />
make them feed into the<br />
chute.<br />
• Fill the food chute evenly<br />
for the best results.<br />
• Empty the bowl every now and then when<br />
processing large amounts.<br />
Tips - slicing g<br />
• Fill the opening completely while the motor is<br />
standing still. Press with the pusher and switch on.<br />
In this manner you prevent the ingredients from<br />
turning over while slicing.<br />
Tips - shredding h<br />
• Before shredding cheese, pre-cut it into small cubes<br />
(approx. 2 cm).<br />
Apply light but steady pressure on to the pusher.<br />
It cannot be helped that the last piece of cheese will<br />
remain between the cover and the disc.<br />
• Ensure that hard cheese (e.g. matured gouda,<br />
parmesan, pecorino) is at room temperature.<br />
• Ensure that half hard cheese (e.g. new and semi<br />
matured gouda, emmenthaler, gruyère) is as cold as<br />
possible.<br />
• If you wish long strings, place the ingredients<br />
horizontally into the filling opening.<br />
• Select I for optimal shredding results.<br />
After use<br />
23<br />
24<br />
1 – 2 – 3 – 4 – 5<br />
- To release the motor unit and lid turn the control<br />
ring to position 1 (fig. 6-7).<br />
- Lift the accessory and the coupler from the bowl<br />
(fig. 23).<br />
After that, you can empty the bowl.<br />
- After slicing or shredding: release the insert from the<br />
insert disc holder (fig. 24). Make sure the insert is<br />
not pointing toward you while doing so. Take care:<br />
the cutting edges are very sharp!<br />
7<br />
Cleaning and storage<br />
• Always remove the mains plug from the wall socket<br />
before cleaning the motor unit. The motor unit may<br />
be wiped with a damp cloth.<br />
Never immerse the motor unit in water. Never pour<br />
water over it.<br />
• Wash the items which have been in contact with the<br />
food in warm soapy water immediately after use.<br />
• Take care when cleaning the metal blade and the<br />
inserts: the cutting edges are very sharp!<br />
These items can also be cleaned in a dishwasher.<br />
• Ensure that the cutting edges do not come into<br />
contact with hard objects as this might make them<br />
blunt.<br />
25<br />
26<br />
• Place the protective cap back on to the metal blade<br />
after cleaning (fig. 25).<br />
• After cleaning, you can store the accessoiries in the<br />
bowl. Place the lid and wind the cord as illustrated in<br />
fig. 26, using the cord clip.


![03_[DE] - Philips](https://img.yumpu.com/25100096/1/184x260/03-de-philips.jpg?quality=85)