WinCC V6.2 Getting Started - DCE FEL ČVUT v Praze
WinCC V6.2 Getting Started - DCE FEL ČVUT v Praze
WinCC V6.2 Getting Started - DCE FEL ČVUT v Praze

You also want an ePaper? Increase the reach of your titles
YUMPU automatically turns print PDFs into web optimized ePapers that Google loves.
07.03 The first <strong>WinCC</strong> Project<br />
2.2 Step 2: Creating a new Project<br />
Manual <strong>WinCC</strong> <strong>V6.2</strong> <strong>Getting</strong> <strong>Started</strong> 23<br />
6ZB5370-0CM02-0BA5<br />
If you are opening <strong>WinCC</strong> for the first time, a dialog box will offer you three options<br />
for creating a project:<br />
• Create a "Single-User Project" (default selection)<br />
• Create a "Multi-User Project"<br />
• Create a "Client Project"<br />
• "Open an existing Project"<br />
Creating the "Qckstart" Project:<br />
Select "Single-User Project" and click on "OK".<br />
Enter "Qckstart" as the project name and select a project path. You can<br />
rename the subfolder if necessary, otherwise it will be given the project name.<br />
If you want to open an existing project, the displayed "Open" dialog box will allow<br />
you to search for ".mcp" files. The next time <strong>WinCC</strong> is started, the last project<br />
worked on will automatically be opened. If the project was activated when <strong>WinCC</strong><br />
was exited, it will be reopened in the activated state.<br />
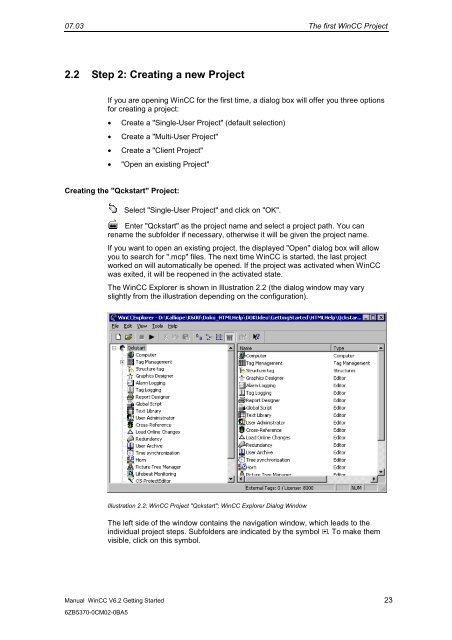
The <strong>WinCC</strong> Explorer is shown in Illustration 2.2 (the dialog window may vary<br />
slightly from the illustration depending on the configuration).<br />
Illustration 2.2: <strong>WinCC</strong> Project "Qckstart"; <strong>WinCC</strong> Explorer Dialog Window<br />
The left side of the window contains the navigation window, which leads to the<br />
individual project steps. Subfolders are indicated by the symbol . To make them<br />
visible, click on this symbol.