- Page 1 and 2:
Ektron CMS400.NET Setup Manual Vers
- Page 3 and 4:
EKTRON, INC. SOFTWARE LICENSE AGREE
- Page 5 and 6:
Table of Contents System Requiremen
- Page 7 and 8:
Customizing Ektron CMS400.NET .....
- Page 9 and 10:
Requirements.......................
- Page 11 and 12:
Component Requirements Client Requi
- Page 13 and 14:
Preparing for Windows XP SP2 Prepar
- Page 15 and 16:
Preparing for Windows XP SP2 If you
- Page 17 and 18: Upgrading Ektron CMS400.NET Upgradi
- Page 19 and 20: Performing the Upgrade Upgrading Ek
- Page 21 and 22: 3. The Setup Type screen appears. C
- Page 23 and 24: 6. Choose a site path directory. If
- Page 25 and 26: 12. The Choose Destination Location
- Page 27 and 28: Upgrading Ektron CMS400.NET 16. If
- Page 29 and 30: 2. The Ektron CMS400.NET Database U
- Page 31 and 32: Backing Up a Microsoft SQL Database
- Page 33 and 34: 8. Set any options. 9. Click OK. If
- Page 35 and 36: 7. In Parameters, choose a backup t
- Page 37 and 38: Backing Up an MSDE2000 Database NOT
- Page 39 and 40: 2. The Language Update Utility open
- Page 41 and 42: 5. Select the type of database you
- Page 43 and 44: 7. Select the languages that you wo
- Page 45 and 46: Upgrading Ektron CMS400.NET 7. Sele
- Page 47 and 48: Upgrading Ektron CMS400.NET 15. The
- Page 49 and 50: Installing Ektron CMS400.NET Instal
- Page 51 and 52: Action What it does For details, se
- Page 53 and 54: Step Setup Screen 6. Select Complet
- Page 55 and 56: Step Setup Screen 8. The Adobe iFil
- Page 57 and 58: Step Setup Screen 12. Select the ty
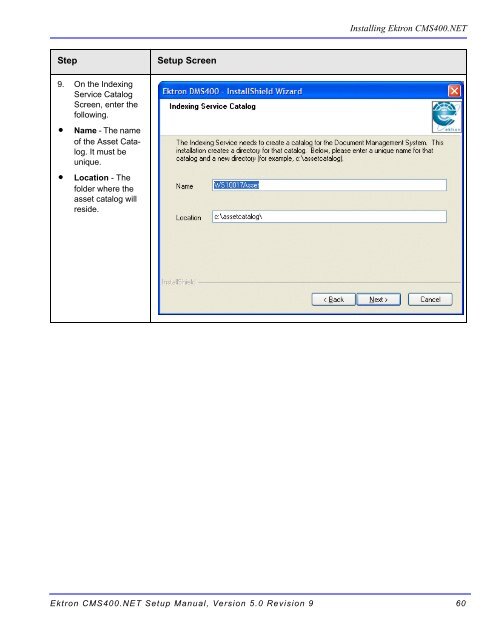
- Page 59 and 60: Step Setup Screen 14. Select the ty
- Page 61 and 62: Step Setup Screen The database setu
- Page 63 and 64: Step Setup Screen Installing Ektron
- Page 65 and 66: Complete Document Management Add-on
- Page 67: Step Setup Screen 5. If your server
- Page 71 and 72: Step Setup Screen 11. This screen p
- Page 73 and 74: Step Setup Screen 15. The Document
- Page 75 and 76: Step Setup Screen Adding a Document
- Page 77 and 78: Step Description Browse for a User
- Page 79 and 80: Step Setup Screen 3. The Web Folder
- Page 81 and 82: Step Setup Screen 1. In the SQL Ent
- Page 83 and 84: Step Setup Screen 3. On the Databas
- Page 85 and 86: Step Setup Screen 2. The following
- Page 87 and 88: File Permissions Installing Ektron
- Page 89 and 90: Step 1: Set up New Site To set up a
- Page 91 and 92: WARNING! Installing Ektron CMS400.N
- Page 93 and 94: Step 3: Set Security on New Folders
- Page 95 and 96: Installing Ektron CMS400.NET 1. In
- Page 97 and 98: Installing Ektron CMS400.NET 7. On
- Page 99 and 100: Managing the web.config File Managi
- Page 101 and 102: Setting Description Managing the we
- Page 103 and 104: Setting Description Managing the we
- Page 105 and 106: Setting Description Managing the we
- Page 107 and 108: Verification for Relay NOTE “ek_S
- Page 109 and 110: 6. The access properties appear. Co
- Page 111 and 112: Configuring E-Mail Notifications 4.
- Page 113 and 114: What’s Next? Configuring E-Mail N
- Page 115 and 116: 6. In the Secure communications are
- Page 117 and 118: 10. Set the SSL Port that the Web s
- Page 119 and 120:
Customizing Ektron CMS400.NET Custo
- Page 121 and 122:
Variables Customizing Ektron CMS400
- Page 123 and 124:
Customizing Ektron CMS400.NET Messa
- Page 125 and 126:
Customizing Ektron CMS400.NET Brand
- Page 127 and 128:
Class Description Customizing Ektro
- Page 129 and 130:
Class Description Customizing Ektro
- Page 131 and 132:
Class Description Customizing Ektro
- Page 133 and 134:
Class Description Customizing Ektro
- Page 135 and 136:
Class Description Customizing Ektro
- Page 137 and 138:
History Classes Class Description L
- Page 139 and 140:
Converting CMS300 to Ektron CMS400.
- Page 141 and 142:
Converting CMS300 to Ektron CMS400.
- Page 143 and 144:
Upgrade Database to Ektron CMS400.N
- Page 145 and 146:
site_scripts_path.asp Converting CM
- Page 147 and 148:
PHP Templates IMPORTANT! Converting
- Page 149 and 150:
Converting CMS300 to Ektron CMS400.
- Page 151 and 152:
Converting CMS300 to Ektron CMS400.
- Page 153 and 154:
Setting up Your New Site NOTE Migra
- Page 155 and 156:
Set up Active Directory Modify the
- Page 157 and 158:
Creating your Templates Migrating/C
- Page 159 and 160:
Moving Content from Staging to Prod
- Page 161 and 162:
Moving Content from Staging to Prod
- Page 163 and 164:
Moving Content from Staging to Prod
- Page 165 and 166:
Deploying with MS Application Cente
- Page 167 and 168:
Other Configurations Audience Requi
- Page 169 and 170:
Deploying with MS Application Cente
- Page 171 and 172:
NOTE 4. The Connect to Server dialo
- Page 173 and 174:
14. The New Cluster Wizard opens. D
- Page 175 and 176:
NOTE 20. The Load Balancing screen
- Page 177 and 178:
NOTE 26. The Application Center sna
- Page 179 and 180:
Deploying with MS Application Cente
- Page 181 and 182:
Deploying with MS Application Cente
- Page 183 and 184:
NOTE 5. The Name and Credentials sc
- Page 185 and 186:
Deploying the Files Deploying with
- Page 187 and 188:
Deploying with MS Application Cente
- Page 189 and 190:
Viewing The Results Deploying with
- Page 191 and 192:
Deploying with MS Application Cente
- Page 193 and 194:
4. Perform an initial synchronizati
- Page 195 and 196:
Deploying with MS Application Cente
- Page 197 and 198:
NOTE Deploying with MS Application
- Page 199 and 200:
Deploying with MS Application Cente
- Page 201 and 202:
9. The Specify Subscriber Types scr
- Page 203 and 204:
Deploying with MS Application Cente
- Page 205 and 206:
Deploying with MS Application Cente
- Page 207 and 208:
4. The Look for Publications screen
- Page 209 and 210:
Deploying with MS Application Cente
- Page 211 and 212:
Deploying with MS Application Cente
- Page 213 and 214:
Deploying with MS Application Cente
- Page 215 and 216:
Deploying with MS Application Cente
- Page 217 and 218:
Deploying with MS Application Cente
- Page 219:
Ektron, Inc. 5 Northern Boulevard,