Advanced Manual
Advanced Manual
Advanced Manual

You also want an ePaper? Increase the reach of your titles
YUMPU automatically turns print PDFs into web optimized ePapers that Google loves.
Using OLYMPUS Master<br />
46 EN<br />
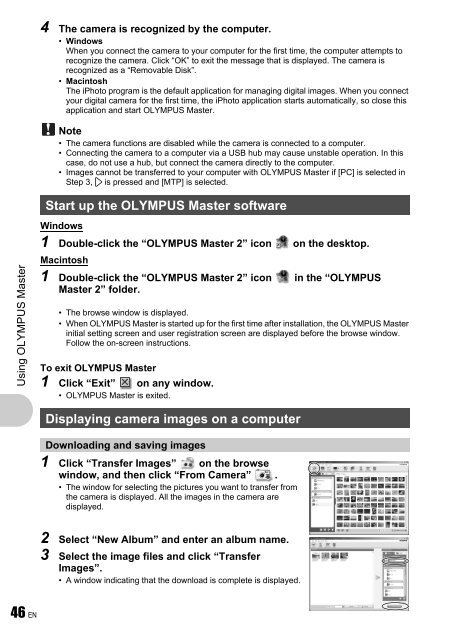
4 The camera is recognized by the computer.<br />
• Windows<br />
When you connect the camera to your computer for the first time, the computer attempts to<br />
recognize the camera. Click “OK” to exit the message that is displayed. The camera is<br />
recognized as a “Removable Disk”.<br />
• Macintosh<br />
The iPhoto program is the default application for managing digital images. When you connect<br />
your digital camera for the first time, the iPhoto application starts automatically, so close this<br />
application and start OLYMPUS Master.<br />
Note<br />
• The camera functions are disabled while the camera is connected to a computer.<br />
• Connecting the camera to a computer via a USB hub may cause unstable operation. In this<br />
case, do not use a hub, but connect the camera directly to the computer.<br />
• Images cannot be transferred to your computer with OLYMPUS Master if [PC] is selected in<br />
Step 3, 3 is pressed and [MTP] is selected.<br />
Start up the OLYMPUS Master software<br />
Windows<br />
1 Double-click the “OLYMPUS Master 2” icon on the desktop.<br />
Macintosh<br />
1 Double-click the “OLYMPUS Master 2” icon in the “OLYMPUS<br />
Master 2” folder.<br />
• The browse window is displayed.<br />
• When OLYMPUS Master is started up for the first time after installation, the OLYMPUS Master<br />
initial setting screen and user registration screen are displayed before the browse window.<br />
Follow the on-screen instructions.<br />
To exit OLYMPUS Master<br />
1 Click “Exit” on any window.<br />
• OLYMPUS Master is exited.<br />
Displaying camera images on a computer<br />
Downloading and saving images<br />
1 Click “Transfer Images” on the browse<br />
window, and then click “From Camera” .<br />
• The window for selecting the pictures you want to transfer from<br />
the camera is displayed. All the images in the camera are<br />
displayed.<br />
2 Select “New Album” and enter an album name.<br />
3 Select the image files and click “Transfer<br />
Images”.<br />
• A window indicating that the download is complete is displayed.