- Page 2 and 3: 2006 General Motors Light Service S
- Page 6 and 7: Section 1 Seats and Restraints Troo
- Page 8 and 9: 2. Place the pin in the hole provid
- Page 10 and 11: Section 2 Features and Controls Win
- Page 12 and 13: Starting and Operating Your Vehicle
- Page 14 and 15: Storage Areas Cargo Cover The vehic
- Page 16 and 17: 13. Secure the bows in place with t
- Page 18 and 19: 2. Place the barrel into the upper
- Page 20 and 21: Section 3 Instrument Panel Instrume
- Page 22 and 23: The main components of your instrum
- Page 24 and 25: Blackout Drive Light Control The sw
- Page 26 and 27: Interior Lamp or Device Instrument
- Page 28 and 29: Warning Lights, Gages and Indicator
- Page 30 and 31: Air Filter Restriction Indicator Ti
- Page 32 and 33: Section 4 Driving Your Vehicle Your
- Page 34 and 35: vehicle dimensions (A). For actual
- Page 36 and 37: Receiver Extension The receiver ext
- Page 38 and 39: Recovery Loops Front of the Vehicle
- Page 40 and 41: Towing Towing Your Vehicle When tow
- Page 42 and 43: Towing a Trailer The vehicle is equ
- Page 44 and 45: Section 5 Service and Appearance Ca
- Page 46 and 47: Fuel Using JP8 as a Fuel JP8 fuel i
- Page 48 and 49: Battery The vehicle may be equipped
- Page 50 and 51: 3. Turn off the ignition on both ve
- Page 52 and 53: 11. Start the vehicle with the dead
- Page 54 and 55:
To avoid the possibility of the veh
- Page 56 and 57:
Note: It may take up to 30 minutes
- Page 58 and 59:
Engine Control Module (ECM) When ti
- Page 60 and 61:
tire beads and positively locks the
- Page 62 and 63:
To open the swing away spare tire c
- Page 64 and 65:
The following steps apply only to v
- Page 66 and 67:
4. Using the wheel wrench and ratch
- Page 68 and 69:
Place the jack only at the appropri
- Page 70 and 71:
13. After mounting the spare, put t
- Page 72 and 73:
6. Turn the wheel wrench with the w
- Page 74 and 75:
13. Turn the wheel wrench clockwise
- Page 76 and 77:
Storing a Flat or Spare Tire and To
- Page 78 and 79:
J (Cold Pressure Indicator): This m
- Page 80 and 81:
3. Press SET button to return to no
- Page 82 and 83:
Tire Pressure Monitor System Progra
- Page 84 and 85:
Repeat programming steps 2-7 until
- Page 86 and 87:
6. To disable this feature press th
- Page 88 and 89:
Advanced Programming-Level 2 Slope
- Page 90 and 91:
If more than one tire location cont
- Page 92 and 93:
Vent Filters Transfer Case The filt
- Page 94 and 95:
Capacities and Specifications Wheel
- Page 96 and 97:
Appearance Care Washing Your Vehicl
- Page 98 and 99:
NOTES 5-55
- Page 100 and 101:
Section 6 Maintenance Schedule Main
- Page 102 and 103:
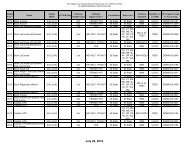
Recommended Fluids and Lubricants F
- Page 104 and 105:
Date Odometer Reading Serviced By S
- Page 106 and 107:
NOTES 6-7
- Page 108 and 109:
Section 7 Customer Assistance Infor
- Page 110 and 111:
A Accessory Panel Blackout Lighting
- Page 112 and 113:
L Lamps Exterior...................
- Page 114 and 115:
U Underbody Protection.............