2006 LSSV Owner's Manual Supplement (PDF) - GM Fleet
2006 LSSV Owner's Manual Supplement (PDF) - GM Fleet
2006 LSSV Owner's Manual Supplement (PDF) - GM Fleet

Create successful ePaper yourself
Turn your PDF publications into a flip-book with our unique Google optimized e-Paper software.
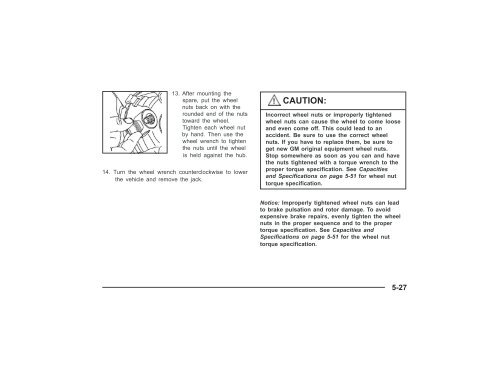
13. After mounting the<br />
spare, put the wheel<br />
nuts back on with the<br />
rounded end of the nuts<br />
toward the wheel.<br />
Tighten each wheel nut<br />
by hand. Then use the<br />
wheel wrench to tighten<br />
the nuts until the wheel<br />
is held against the hub.<br />
14. Turn the wheel wrench counterclockwise to lower<br />
the vehicle and remove the jack.<br />
CAUTION:<br />
Incorrect wheel nuts or improperly tightened<br />
wheel nuts can cause the wheel to come loose<br />
and even come off. This could lead to an<br />
accident. Be sure to use the correct wheel<br />
nuts. If you have to replace them, be sure to<br />
get new <strong>GM</strong> original equipment wheel nuts.<br />
Stop somewhere as soon as you can and have<br />
the nuts tightened with a torque wrench to the<br />
proper torque specification. See Capacities<br />
and Specifications on page 5-51 for wheel nut<br />
torque specification.<br />
Notice: Improperly tightened wheel nuts can lead<br />
to brake pulsation and rotor damage. To avoid<br />
expensive brake repairs, evenly tighten the wheel<br />
nuts in the proper sequence and to the proper<br />
torque specification. See Capacities and<br />
Specifications on page 5-51 for the wheel nut<br />
torque specification.<br />
5-27