2006 LSSV Owner's Manual Supplement (PDF) - GM Fleet
2006 LSSV Owner's Manual Supplement (PDF) - GM Fleet
2006 LSSV Owner's Manual Supplement (PDF) - GM Fleet

You also want an ePaper? Increase the reach of your titles
YUMPU automatically turns print PDFs into web optimized ePapers that Google loves.
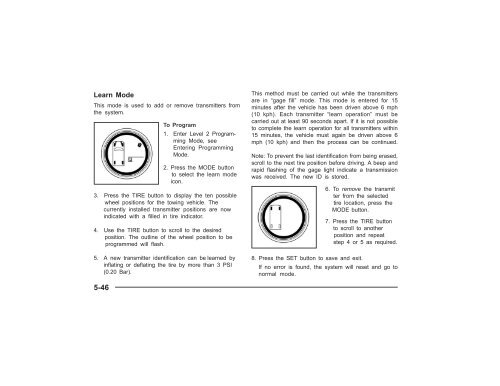
Learn Mode<br />
This mode is used to add or remove transmitters from<br />
the system.<br />
To Program<br />
1. Enter Level 2 Programming<br />
Mode, see<br />
Entering Programming<br />
Mode.<br />
2. Press the MODE button<br />
to select the learn mode<br />
icon.<br />
3. Press the TIRE button to display the ten possible<br />
wheel positions for the towing vehicle. The<br />
currently installed transmitter positions are now<br />
indicated with a filled in tire indicator.<br />
4. Use the TIRE button to scroll to the desired<br />
position. The outline of the wheel position to be<br />
programmed will flash.<br />
5. A new transmitter identification can be learned by<br />
inflating or deflating the tire by more than 3 PSI<br />
(0.20 Bar).<br />
This method must be carried out while the transmitters<br />
are in “gage fill” mode. This mode is entered for 15<br />
minutes after the vehicle has been driven above 6 mph<br />
(10 kph). Each transmitter “learn operation” must be<br />
carried out at least 90 seconds apart. If it is not possible<br />
to complete the learn operation for all transmitters within<br />
15 minutes, the vehicle must again be driven above 6<br />
mph (10 kph) and then the process can be continued.<br />
Note: To prevent the last identification from being erased,<br />
scroll to the next tire position before driving. A beep and<br />
rapid flashing of the gage light indicate a transmission<br />
was received. The new ID is stored.<br />
6. To remove the transmit<br />
ter from the selected<br />
tire location, press the<br />
MODE button.<br />
7. Press the TIRE button<br />
to scroll to another<br />
position and repeat<br />
step 4 or 5 as required.<br />
8. Press the SET button to save and exit.<br />
If no error is found, the system will reset and go to<br />
normal mode.<br />
5-46