

6100CR Refrigerated Sampler - Isco
6100CR Refrigerated Sampler - Isco
6100CR Refrigerated Sampler - Isco

You also want an ePaper? Increase the reach of your titles
YUMPU automatically turns print PDFs into web optimized ePapers that Google loves.
<strong>6100CR</strong> <strong>Refrigerated</strong> <strong>Sampler</strong><br />
Section 3 Installation of the <strong>Sampler</strong><br />
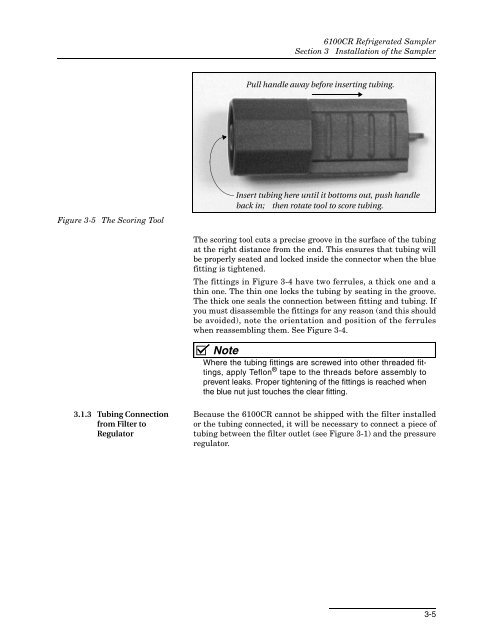
Pull handle away before inserting tubing.<br />
Figure 3-5 The Scoring Tool<br />
Insert tubing here until it bottoms out, push handle<br />
back in; then rotate tool to score tubing.<br />
The scoring tool cuts a precise groove in the surface of the tubing<br />
at the right distance from the end. This ensures that tubing will<br />
be properly seated and locked inside the connector when the blue<br />
fitting is tightened.<br />
The fittings in Figure 3-4 have two ferrules, a thick one and a<br />
thin one. The thin one locks the tubing by seating in the groove.<br />
The thick one seals the connection between fitting and tubing. If<br />
you must disassemble the fittings for any reason (and this should<br />
be avoided), note the orientation and position of the ferrules<br />
when reassembling them. See Figure 3-4.<br />
Note<br />
Where the tubing fittings are screwed into other threaded fittings,<br />
apply Teflon ® tape to the threads before assembly to<br />
prevent leaks. Proper tightening of the fittings is reached when<br />
the blue nut just touches the clear fitting.<br />
3.1.3 Tubing Connection<br />
from Filter to<br />
Regulator<br />
Because the <strong>6100CR</strong> cannot be shipped with the filter installed<br />
or the tubing connected, it will be necessary to connect a piece of<br />
tubing between the filter outlet (see Figure 3-1) and the pressure<br />
regulator.<br />
3-5


