Mbox Pro User Guide v9.0 (PDF) - Digidesign
Mbox Pro User Guide v9.0 (PDF) - Digidesign
Mbox Pro User Guide v9.0 (PDF) - Digidesign

You also want an ePaper? Increase the reach of your titles
YUMPU automatically turns print PDFs into web optimized ePapers that Google loves.
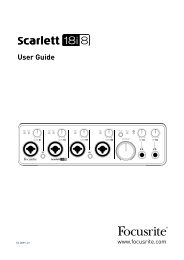
Using a Mic with an XLR Connector<br />
(Input Channels 1–2)<br />
To use a microphone with an XLR connector:<br />
1 Plug your microphone cable into one of the<br />
two Mic/DI inputs on the front of <strong>Mbox</strong> <strong>Pro</strong> (in<br />
this example, input 2).<br />
Input 1<br />
Mic input<br />
Phantom Power switch<br />
48V (Phantom Power)<br />
4 On the front of the <strong>Mbox</strong> <strong>Pro</strong>, turn the master<br />
volume knob to the desired level.<br />
Gain knob<br />
Master volume knob<br />
Mic/DI input 2<br />
XLR connector plugged into Input 2 (Mic/DI combo jack)<br />
2 Set the input source to Mic/DI (microphone)<br />
by pressing the Front/Rear switch for channel 2<br />
to the “out” position. (When the button is set to<br />
the “out” position, the front panel, combo<br />
Mic/DI inputs will be active. When the button is<br />
set to the “in” position, the back panel Line inputs<br />
will be active.)<br />
Gain knob for Input 1 (Master volume knob shown)<br />
5 On the front of the <strong>Mbox</strong> <strong>Pro</strong>, carefully turn<br />
the Gain knob to the right to increase the input<br />
level of your microphone signal.<br />
6 If the incoming signal is too loud, press the<br />
Push/Pull knob to engage the –20 dB pad.<br />
Front/Rear switches<br />
Front/Rear switches for Mic/DI combo jacks<br />
3 If your microphone requires phantom power,<br />
make sure the microphone is connected, then<br />
press the Phantom Power switch (labeled 48V)<br />
on the front of the <strong>Mbox</strong> <strong>Pro</strong>. This switch sends<br />
48V to all four mic inputs. The 48V LED on the<br />
front of the <strong>Mbox</strong> <strong>Pro</strong> lights when phantom<br />
power is engaged.<br />
Input 2 Pad<br />
–20 dB Pad<br />
Chapter 4: Making Studio Connections 17