Smalltalk and Object Orientation: an Introduction - Free
Smalltalk and Object Orientation: an Introduction - Free
Smalltalk and Object Orientation: an Introduction - Free

You also want an ePaper? Increase the reach of your titles
YUMPU automatically turns print PDFs into web optimized ePapers that Google loves.
27.3.4 Widget layout control<br />
The widget layout control butto ns are presented across the top of the c<strong>an</strong>vas tool window. The first six<br />
buttons control widget alignment, the next four control widget distribution <strong><strong>an</strong>d</strong> the last two control<br />
widget size. Each of the operations is relative to the first widget selected. For example, the first button<br />
will align all the currently selected widgets such that their tops are all in line with the very first widget<br />
selected.<br />
27.3.5 Properties, aspects <strong><strong>an</strong>d</strong> actions<br />
The properties button on the c<strong>an</strong>vas tool brings up the properties tool. This tool displays the information<br />
appropriate for the selected widget. If no widget is selected then the window details are selected.<br />
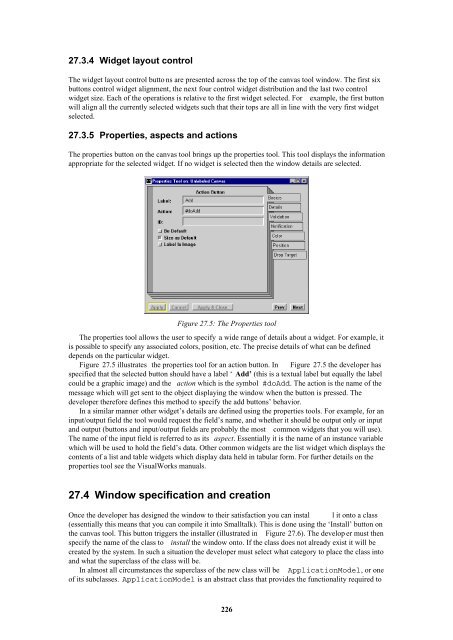
Figure 27.5: The Properties tool<br />
The properties tool allows the user to specify a wide r<strong>an</strong>ge of details about a widget. For example, it<br />
is possible to specify <strong>an</strong>y associated colors, position, etc. The precise details of what c<strong>an</strong> be defined<br />
depends on the particular widget.<br />
Figure 27.5 illustrates the properties tool for <strong>an</strong> action button. In Figure 27.5 the developer has<br />
specified that the selected button should have a label ‘ Add’ (this is a textual label but equally the label<br />
could be a graphic image) <strong><strong>an</strong>d</strong> the action which is the symbol #doAdd. The action is the name of the<br />
message which will get sent to the object displaying the window when the button is pressed. The<br />
developer therefore defines this method to specify the add buttons’ behavior.<br />
In a similar m<strong>an</strong>ner other widget’s details are defined using the properties tools. For example, for <strong>an</strong><br />
input/output field the tool would request the field’s name, <strong><strong>an</strong>d</strong> whether it should be output only or input<br />
<strong><strong>an</strong>d</strong> output (buttons <strong><strong>an</strong>d</strong> input/output fields are probably the most common widgets that you will use).<br />
The name of the input field is referred to as its aspect. Essentially it is the name of <strong>an</strong> inst<strong>an</strong>ce variable<br />
which will be used to hold the field’s data. Other common widgets are the list widget which displays the<br />
contents of a list <strong><strong>an</strong>d</strong> table widgets which display data held in tabular form. For further details on the<br />
properties tool see the VisualWorks m<strong>an</strong>uals.<br />
27.4 Window specification <strong><strong>an</strong>d</strong> creation<br />
Once the developer has designed the window to their satisfaction you c<strong>an</strong> instal l it onto a class<br />
(essentially this me<strong>an</strong>s that you c<strong>an</strong> compile it into <strong>Smalltalk</strong>). This is done using the ‘Install’ button on<br />
the c<strong>an</strong>vas tool. This button triggers the installer (illustrated in Figure 27.6). The develop er must then<br />
specify the name of the class to install the window onto. If the class does not already exist it will be<br />
created by the system. In such a situation the developer must select what category to place the class into<br />
<strong><strong>an</strong>d</strong> what the superclass of the class will be.<br />
In almost all circumst<strong>an</strong>ces the superclass of the new class will be ApplicationModel, or one<br />
of its subclasses. ApplicationModel is <strong>an</strong> abstract class that provides the functionality required to<br />
226