Smalltalk and Object Orientation: an Introduction - Free
Smalltalk and Object Orientation: an Introduction - Free
Smalltalk and Object Orientation: an Introduction - Free

Create successful ePaper yourself
Turn your PDF publications into a flip-book with our unique Google optimized e-Paper software.
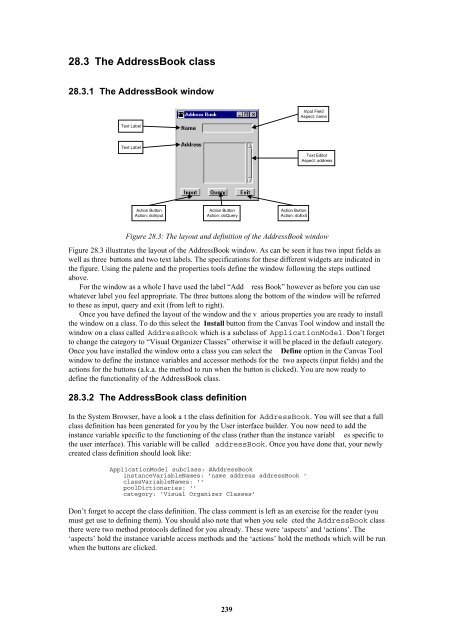
28.3 The AddressBook class<br />
28.3.1 The AddressBook window<br />
Input Field<br />
Aspect: name<br />
Text Label<br />
Text Label<br />
Text Editor<br />
Aspect: address<br />
Action Button<br />
Action: doInput<br />
Action Button<br />
Action: doQuery<br />
Action Button<br />
Action: doExit<br />
Figure 28.3: The layout <strong><strong>an</strong>d</strong> definition of the AddressBook window<br />
Figure 28.3 illustrates the layout of the AddressBook window. As c<strong>an</strong> be seen it has two input fields as<br />
well as three buttons <strong><strong>an</strong>d</strong> two text labels. The specifications for these different widgets are indicated in<br />
the figure. Using the palette <strong><strong>an</strong>d</strong> the properties tools define the window following the steps outlined<br />
above.<br />
For the window as a whole I have used the label “Add ress Book” however as before you c<strong>an</strong> use<br />
whatever label you feel appropriate. The three buttons along the bottom of the window will be referred<br />
to these as input, query <strong><strong>an</strong>d</strong> exit (from left to right).<br />
Once you have defined the layout of the window <strong><strong>an</strong>d</strong> the v arious properties you are ready to install<br />
the window on a class. To do this select the Install button from the C<strong>an</strong>vas Tool window <strong><strong>an</strong>d</strong> install the<br />
window on a class called AddressBook which is a subclass of ApplicationModel. Don’t forget<br />
to ch<strong>an</strong>ge the category to “Visual Org<strong>an</strong>izer Classes” otherwise it will be placed in the default category.<br />
Once you have installed the window onto a class you c<strong>an</strong> select the Define option in the C<strong>an</strong>vas Tool<br />
window to define the inst<strong>an</strong>ce variables <strong><strong>an</strong>d</strong> accessor methods for the two aspects (input fields) <strong><strong>an</strong>d</strong> the<br />
actions for the buttons (a.k.a. the method to run when the button is clicked). You are now ready to<br />
define the functionality of the AddressBook class.<br />
28.3.2 The AddressBook class definition<br />
In the System Browser, have a look a t the class definition for AddressBook. You will see that a full<br />
class definition has been generated for you by the User interface builder. You now need to add the<br />
inst<strong>an</strong>ce variable specific to the functioning of the class (rather th<strong>an</strong> the inst<strong>an</strong>ce variabl es specific to<br />
the user interface). This variable will be called addressBook. Once you have done that, your newly<br />
created class definition should look like:<br />
ApplicationModel subclass: #AddressBook<br />
inst<strong>an</strong>ceVariableNames: 'name address addressBook '<br />
classVariableNames: ''<br />
poolDictionaries: ''<br />
category: 'Visual Org<strong>an</strong>izer Classes'<br />
Don’t forget to accept the class definition. The class comment is left as <strong>an</strong> exercise for the reader (you<br />
must get use to defining them). You should also note that when you sele cted the AddressBook class<br />
there were two method protocols defined for you already. These were ‘aspects’ <strong><strong>an</strong>d</strong> ‘actions’. The<br />
‘aspects’ hold the inst<strong>an</strong>ce variable access methods <strong><strong>an</strong>d</strong> the ‘actions’ hold the methods which will be run<br />
when the buttons are clicked.<br />
239