Smalltalk and Object Orientation: an Introduction - Free
Smalltalk and Object Orientation: an Introduction - Free
Smalltalk and Object Orientation: an Introduction - Free

Create successful ePaper yourself
Turn your PDF publications into a flip-book with our unique Google optimized e-Paper software.
The action of adding a new graphic object to the drawing displayed by the custom view in the<br />
SmallDraw application is initiated by the user pressing the left mouse button. Historically the mouse<br />
buttons were known as red, yellow <strong><strong>an</strong>d</strong> blue for the left, middle <strong><strong>an</strong>d</strong> righ t mouse buttons. This was<br />
because the original system on which <strong>Smalltalk</strong> was developed had multi -color mouse buttons (colored<br />
red, yellow <strong><strong>an</strong>d</strong> blue). Although <strong>Smalltalk</strong> is now available on systems with one, two <strong><strong>an</strong>d</strong> three mouse<br />
buttons (all of which tend to be shades of the same color e.g. white, gray or cream) there are still places<br />
in the system where reference is made to the color of the mouse button - this is one of them.<br />
When the left mouse button is pressed a redButtonActivity message is sent to the<br />
drawingController (as illustrated in Figure 29.8). This allows the drawingController to<br />
decide what action to perform in response to the left mouse button being pressed. For example, <strong>an</strong><br />
application may specify that a menu should be displayed or that <strong>an</strong>y object under the mouse is selected<br />
etc. In the case of the SmallDraw application the action is to place a graphic object (of the appropriate<br />
style) at the current cursor location. To do this, the<br />
drawingController sends <strong>an</strong><br />
addWidgetAt: message to the drawingModel.<br />
Next the drawingModel creates a new inst<strong>an</strong>ce of the appropriate type of object. In the diagram<br />
illustrated in Figure 29.8 the current style is that of #box. Therefore a new inst<strong>an</strong>ce of BoxWidget is<br />
created. This boxWidget inst<strong>an</strong>ce is then sent a message origin: which sets its position within the<br />
view. The boxWidget is then added to the orderedCollection used to hold all the graphic<br />
objects. Next the drawingModel sends itself the ch<strong>an</strong>ged:with: message so that all of its<br />
dependents c<strong>an</strong> be informed that a ch<strong>an</strong>ge has taken place.<br />
This results in <strong>an</strong> update:with: message being sent to the drawingView via the dependency<br />
mech<strong>an</strong>ism. The drawingView then sends a displayOn: message to the o bjects to be displayed.<br />
The boxWidget then uses a border object to display itself on the graphicsContext.<br />
This section has outlined the most difficult part of constructing a custom view for the novice -<br />
working out what is sent where, by what <strong><strong>an</strong>d</strong> when. The thing to remember is that you are slotting your<br />
application specific code into a generic framework. However at this stage it is often much easier to look<br />
at what someone else has done <strong><strong>an</strong>d</strong> to use it as the basis of what you require. While this approach c<strong>an</strong> be<br />
extremely useful as a learning exercise it is still import<strong>an</strong>t to become familiar with this framework. One<br />
way to do this is to place self halt messages into strategic methods (such as update:with: <strong><strong>an</strong>d</strong><br />
displayOn: in the drawingView object) <strong><strong>an</strong>d</strong> then to u se the debugger to explore the objects <strong><strong>an</strong>d</strong><br />
messages which have been sent.<br />
29.4.4 Refreshing<br />
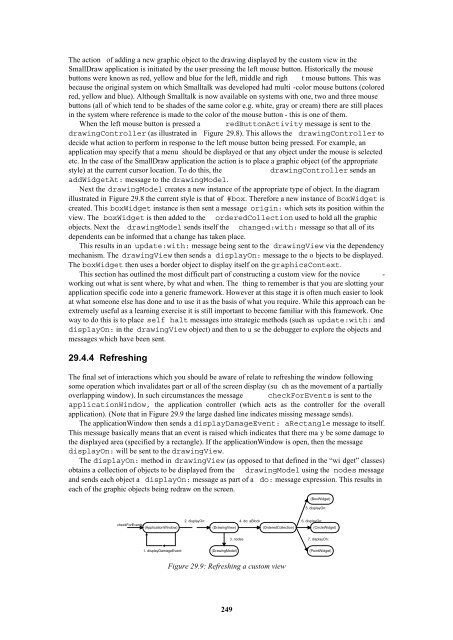
The final set of interactions which you should be aware of relate to refreshing the window following<br />
some operation which invalidates part or all of the screen display (su ch as the movement of a partially<br />
overlapping window). In such circumst<strong>an</strong>ces the message checkForEvents is sent to the<br />
applicationWindow, the application controller (which acts as the controller for the overall<br />
application). (Note that in Figure 29.9 the large dashed line indicates missing message sends).<br />
The applicationWindow then sends a displayDamageEvent: aRect<strong>an</strong>gle message to itself.<br />
This message basically me<strong>an</strong>s that <strong>an</strong> event is raised which indicates that there ma y be some damage to<br />
the displayed area (specified by a rect<strong>an</strong>gle). If the applicationWindow is open, then the message<br />
displayOn: will be sent to the drawingView.<br />
The displayOn: method in drawingView (as opposed to that defined in the “wi dget” classes)<br />
obtains a collection of objects to be displayed from the drawingModel using the nodes message<br />
<strong><strong>an</strong>d</strong> sends each object a displayOn: message as part of a do: message expression. This results in<br />
each of the graphic objects being redraw on the screen.<br />
(BoxWidget)<br />
5. displayOn:<br />
checkForEvents<br />
(ApplicationWindow)<br />
2. displayOn:<br />
(DrawingView)<br />
4. do: aBlock 6. displayOn:<br />
(OrderedCollection)<br />
(CircleWidget)<br />
3. nodes<br />
7. displayOn:<br />
1. displayDamageEvent:<br />
(DrawingModel)<br />
(PointWidget)<br />
Figure 29.9: Refreshing a custom view<br />
249