Smalltalk and Object Orientation: an Introduction - Free
Smalltalk and Object Orientation: an Introduction - Free
Smalltalk and Object Orientation: an Introduction - Free

You also want an ePaper? Increase the reach of your titles
YUMPU automatically turns print PDFs into web optimized ePapers that Google loves.
Inst<strong>an</strong>ce based reuse is more complicated to achieve but has the adv<strong>an</strong>tage that the required<br />
functionality is also obtained.<br />
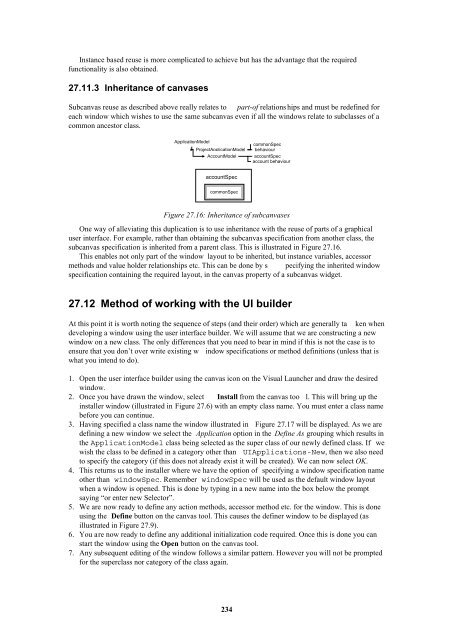
27.11.3 Inherit<strong>an</strong>ce of c<strong>an</strong>vases<br />
Subc<strong>an</strong>vas reuse as described above really relates to part-of relations hips <strong><strong>an</strong>d</strong> must be redefined for<br />
each window which wishes to use the same subc<strong>an</strong>vas even if all the windows relate to subclasses of a<br />
common <strong>an</strong>cestor class.<br />
ApplicationModel<br />
ProjectApplicationModel<br />
AccountModel<br />
commonSpec<br />
behaviour<br />
accountSpec<br />
account behaviour<br />
accountSpec<br />
commonSpec<br />
Figure 27.16: Inherit<strong>an</strong>ce of subc<strong>an</strong>vases<br />
One way of alleviating this duplication is to use inherit<strong>an</strong>ce with the reuse of parts of a graphical<br />
user interface. For example, rather th<strong>an</strong> obtaining the subc<strong>an</strong>vas specification from <strong>an</strong>other class, the<br />
subc<strong>an</strong>vas specification is inherited from a parent class. This is illustrated in Figure 27.16.<br />
This enables not only part of the window layout to be inherited, but inst<strong>an</strong>ce variables, accessor<br />
methods <strong><strong>an</strong>d</strong> value holder relationships etc. This c<strong>an</strong> be done by s pecifying the inherited window<br />
specification containing the required layout, in the c<strong>an</strong>vas property of a subc<strong>an</strong>vas widget.<br />
27.12 Method of working with the UI builder<br />
At this point it is worth noting the sequence of steps (<strong><strong>an</strong>d</strong> their order) which are generally ta ken when<br />
developing a window using the user interface builder. We will assume that we are constructing a new<br />
window on a new class. The only differences that you need to bear in mind if this is not the case is to<br />
ensure that you don’t over write existing w indow specifications or method definitions (unless that is<br />
what you intend to do).<br />
1. Open the user interface builder using the c<strong>an</strong>vas icon on the Visual Launcher <strong><strong>an</strong>d</strong> draw the desired<br />
window.<br />
2. Once you have drawn the window, select Install from the c<strong>an</strong>vas too l. This will bring up the<br />
installer window (illustrated in Figure 27.6) with <strong>an</strong> empty class name. You must enter a class name<br />
before you c<strong>an</strong> continue.<br />
3. Having specified a class name the window illustrated in Figure 27.17 will be displayed. As we are<br />
defining a new window we select the Application option in the Define As grouping which results in<br />
the ApplicationModel class being selected as the super class of our newly defined class. If we<br />
wish the class to be defined in a category other th<strong>an</strong> UIApplications-New, then we also need<br />
to specify the category (if this does not already exist it will be created). We c<strong>an</strong> now select OK.<br />
4. This returns us to the installer where we have the option of specifying a window specification name<br />
other th<strong>an</strong> windowSpec. Remember windowSpec will be used as the default window layout<br />
when a window is opened. This is done by typing in a new name into the box below the prompt<br />
saying “or enter new Selector”.<br />
5. We are now ready to define <strong>an</strong>y action methods, accessor method etc. for the window. This is done<br />
using the Define button on the c<strong>an</strong>vas tool. This causes the definer window to be displayed (as<br />
illustrated in Figure 27.9).<br />
6. You are now ready to define <strong>an</strong>y additional initialization code required. Once this is done you c<strong>an</strong><br />
start the window using the Open button on the c<strong>an</strong>vas tool.<br />
7. Any subsequent editing of the window follows a similar pattern. However you will not be prompted<br />
for the superclass nor category of the class again.<br />
234